Earlier articles of the serie cowl the deployment of a CDP Public Cloud atmosphere. All of the parts are prepared to be used and it’s time to make the atmosphere obtainable to different customers to discover all of the providers and run their experiments.
This text is the fourth in a sequence of six:
Onboarding customers to work on a CDP atmosphere and providers, is achieved in two methods, by configuring an id supplier or by importing customers in bulk.
This text concentrate on configuring Keycloak as an Identification Supplier (IdP) for CDP. Keycloak permits us to arrange id federation with CDP because it helps Safety Assertion Markup Language (SAML 2.0) protocol. Identification federation permits customers to login into the CDP console by way of Keycloak authentication with out registering with Cloudera or making a Cloudera account.
Onboarding customers and configuring Keycloak as an Identification Supplier for CDP is finished through the Keycloak net interface (Admin console) or utilizing the terminal. Each approaches are lined.
From the aspect of CDP, Account administrator or PowerUser roles are required to finish this course of.
Deploy Keycloak utilizing an AWS EC2 occasion
Clearly, we have to deploy Keycloak earlier than beginning the id supplier configuration in CDP.
To deploy Keycloak with minimal set up in order that customers can log in utilizing the web, we deploy it with Docker in an AWS EC2 occasion.
To take action, you want an EC2 occasion with the next traits:
- Occasion sort:
t2.micro - AMI:
ami-05e9058d6cda9ba0d - Docker compose put in
- Public IP Deal with
- Inbound rule
8443port
When you created the occasion, be aware of the next info:
- Public IPv4 DNS:
- Public IP Deal with:
- EC2 key-pair:
For an entire information to launch an AWS EC2 occasion that meets these necessities, examine this text Set up Keycloak in an EC2 instance.
As soon as your EC2 occasion is prepared, you’re prepared to begin the Keycloak deployment.
Native machine:
Set the EC2 occasion required variables
export PUBLIC_IPV4_DNS=<PUBLIC_IPV4_DNS>
export AWS_SSH_KEY=<AWS_SSH_KEY>

export EC2_USERNAME=ec2-user
Connect with the EC2 occasion:
ssh -i "~/.ssh/${AWS_SSH_KEY}.pem" ${EC2_USERNAME}@${PUBLIC_IPV4_DNS}EC2 Occasion:
Create the docker-compose.yml file:
cat <<EOF > docker-compose.yml
model: '3'
providers:
  keycloak:
    # The 20.0.0 keycloak picture
    picture: quay.io/keycloak/keycloak:20.0.0
    container_name: keycloak
    atmosphere:
      # Keycloak admin credentials
      KEYCLOAK_ADMIN: admin
      KEYCLOAK_ADMIN_PASSWORD: Password123
    ports:
      # The HTTPS port
      - 8443:8443
      # The HTTP port
      - 8080:8080
    command: start-dev
    volumes:
      # To save lots of the SAML metadata file
      - ./kc_config:/kc_config
volumes:
  kc_config:
    exterior: true
EOF
Create the exterior quantity folder:
Launch the docker compose:
Test that Keycloak is working utilizing Docker:
With a view to have entry to the Keycloak Admin Console (Keycloak net interface) you want to disable the SSL protocol:
-
Enter the container:
docker exec -it keycloak bash -
Add required path to make use of the
kcadm.shscript:export PATH=$PATH:/decide/keycloak/bin -
Give the server and the credentials for the
graspRealm:kcadm.sh config credentials --server http://localhost:8080/ --realm grasp --user $KEYCLOAK_ADMIN --password $KEYCLOAK_ADMIN_PASSWORD -
Disable the SSL for the
graspRealm:kcadm.sh replace realms/grasp -s enabled=true -s sslRequired=none -
The Keycloak net interface its now obtainable within the following deal with:
http://.:8080
Configuration utilizing Keycloak Internet Interface
Utilizing the Keycloak net interface is really useful in case you are not aware of Keycloak, and also you need a greater understanding of methods to hyperlink CDP with Keycloak.
In case you want to begin with an easy-to-reproduce strategy, that lets you do the setup and create customers sooner, scroll all the way down to the Configuration Using the Terminal part.
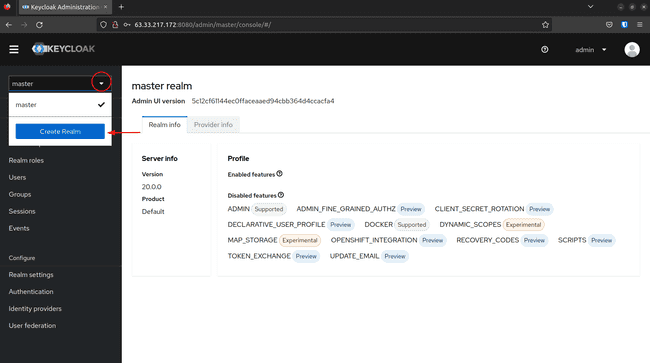
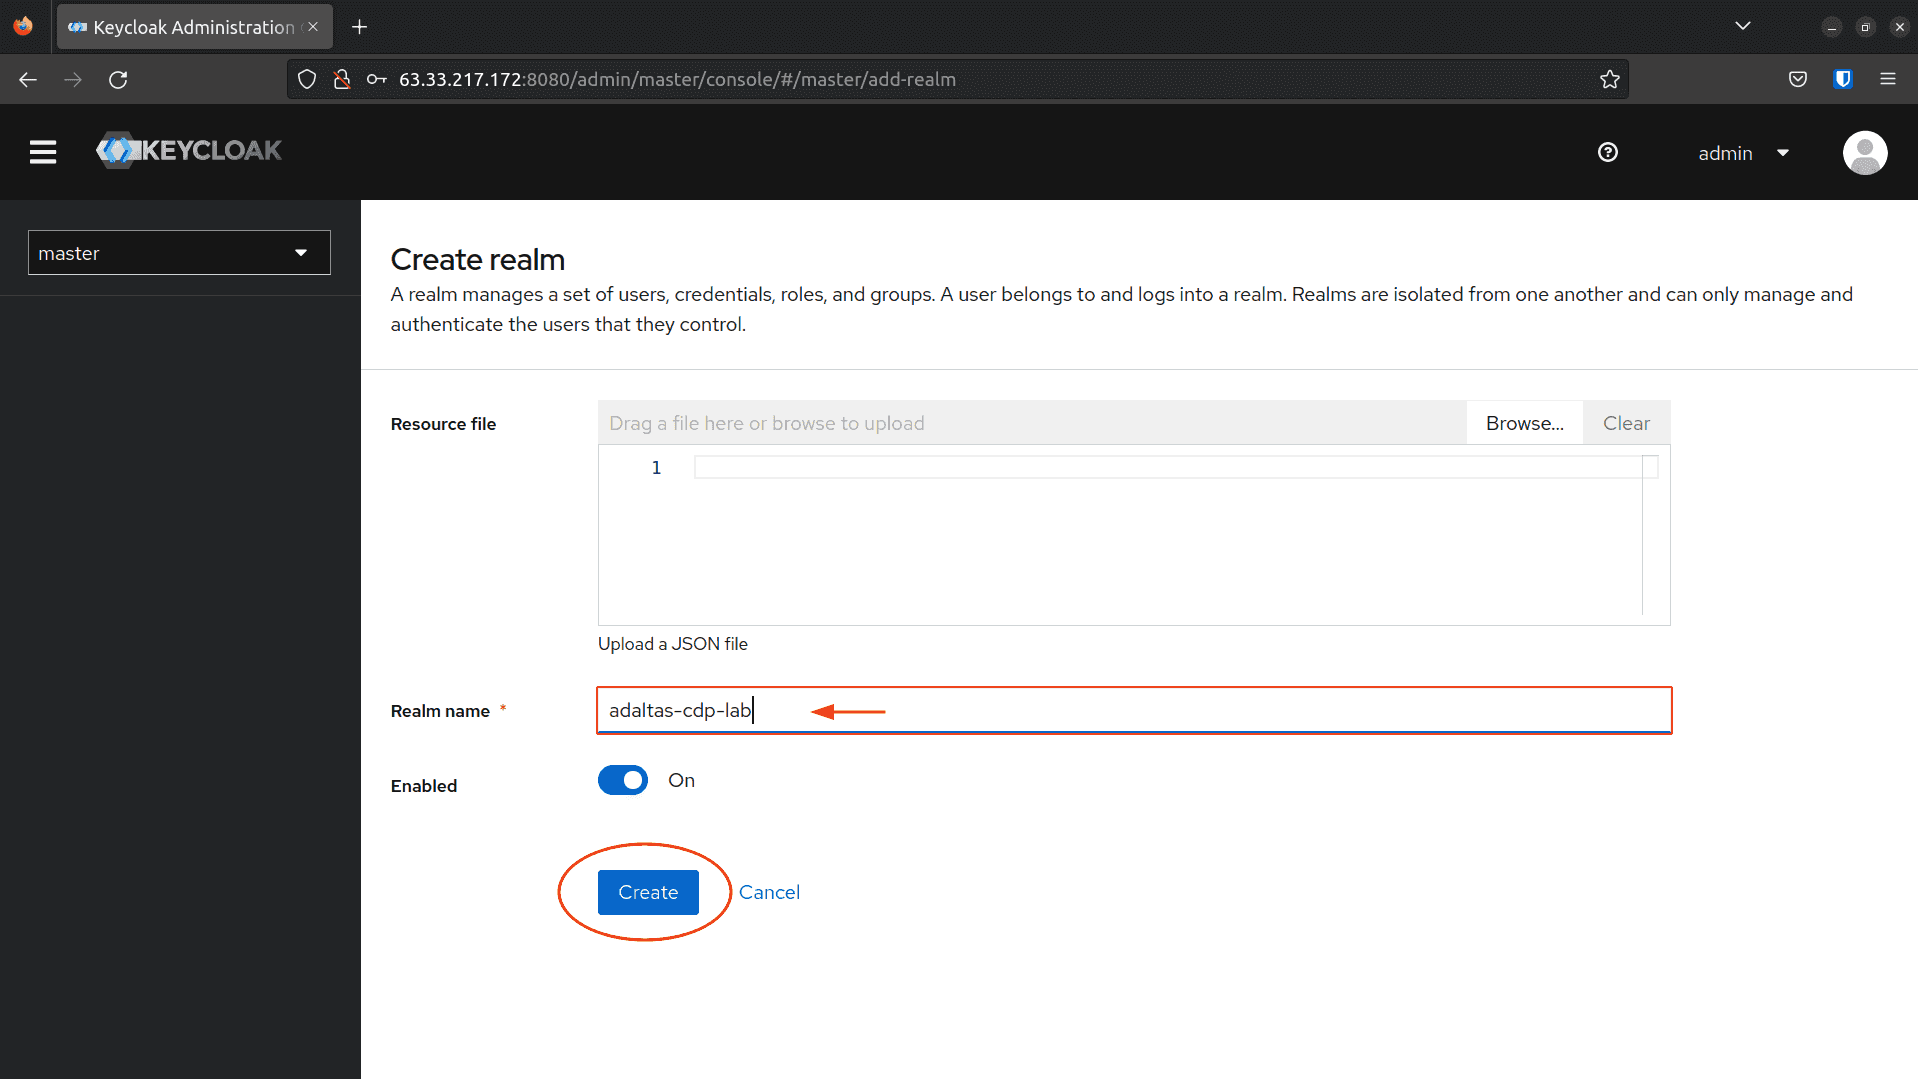
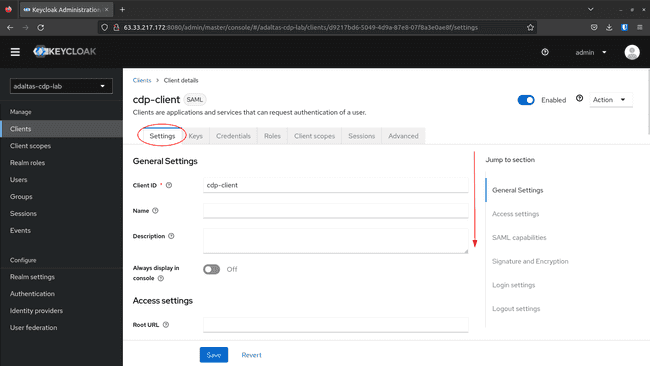
Realm creation
Realm is likely one of the core ideas in Keycloak, a Realm secures and manages safety metadata for a set of customers.
To create a Realm:
-
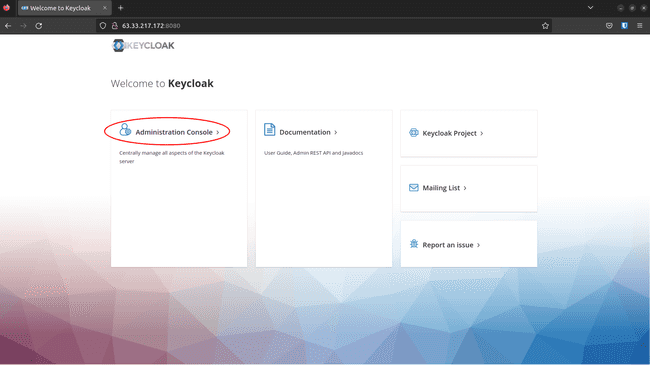
Navigate to
http://, click on Administration Console::8080
-
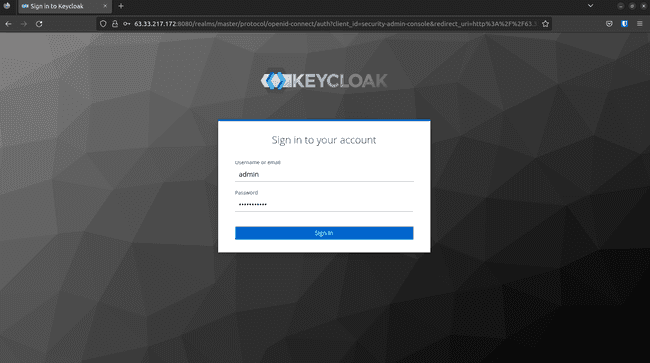
Log in utilizing your
KEYCLOAK_ADMINandKEYCLOAK_ADMIN_PASSWORDoutlined within thedocker-compose.ymlfile:
-
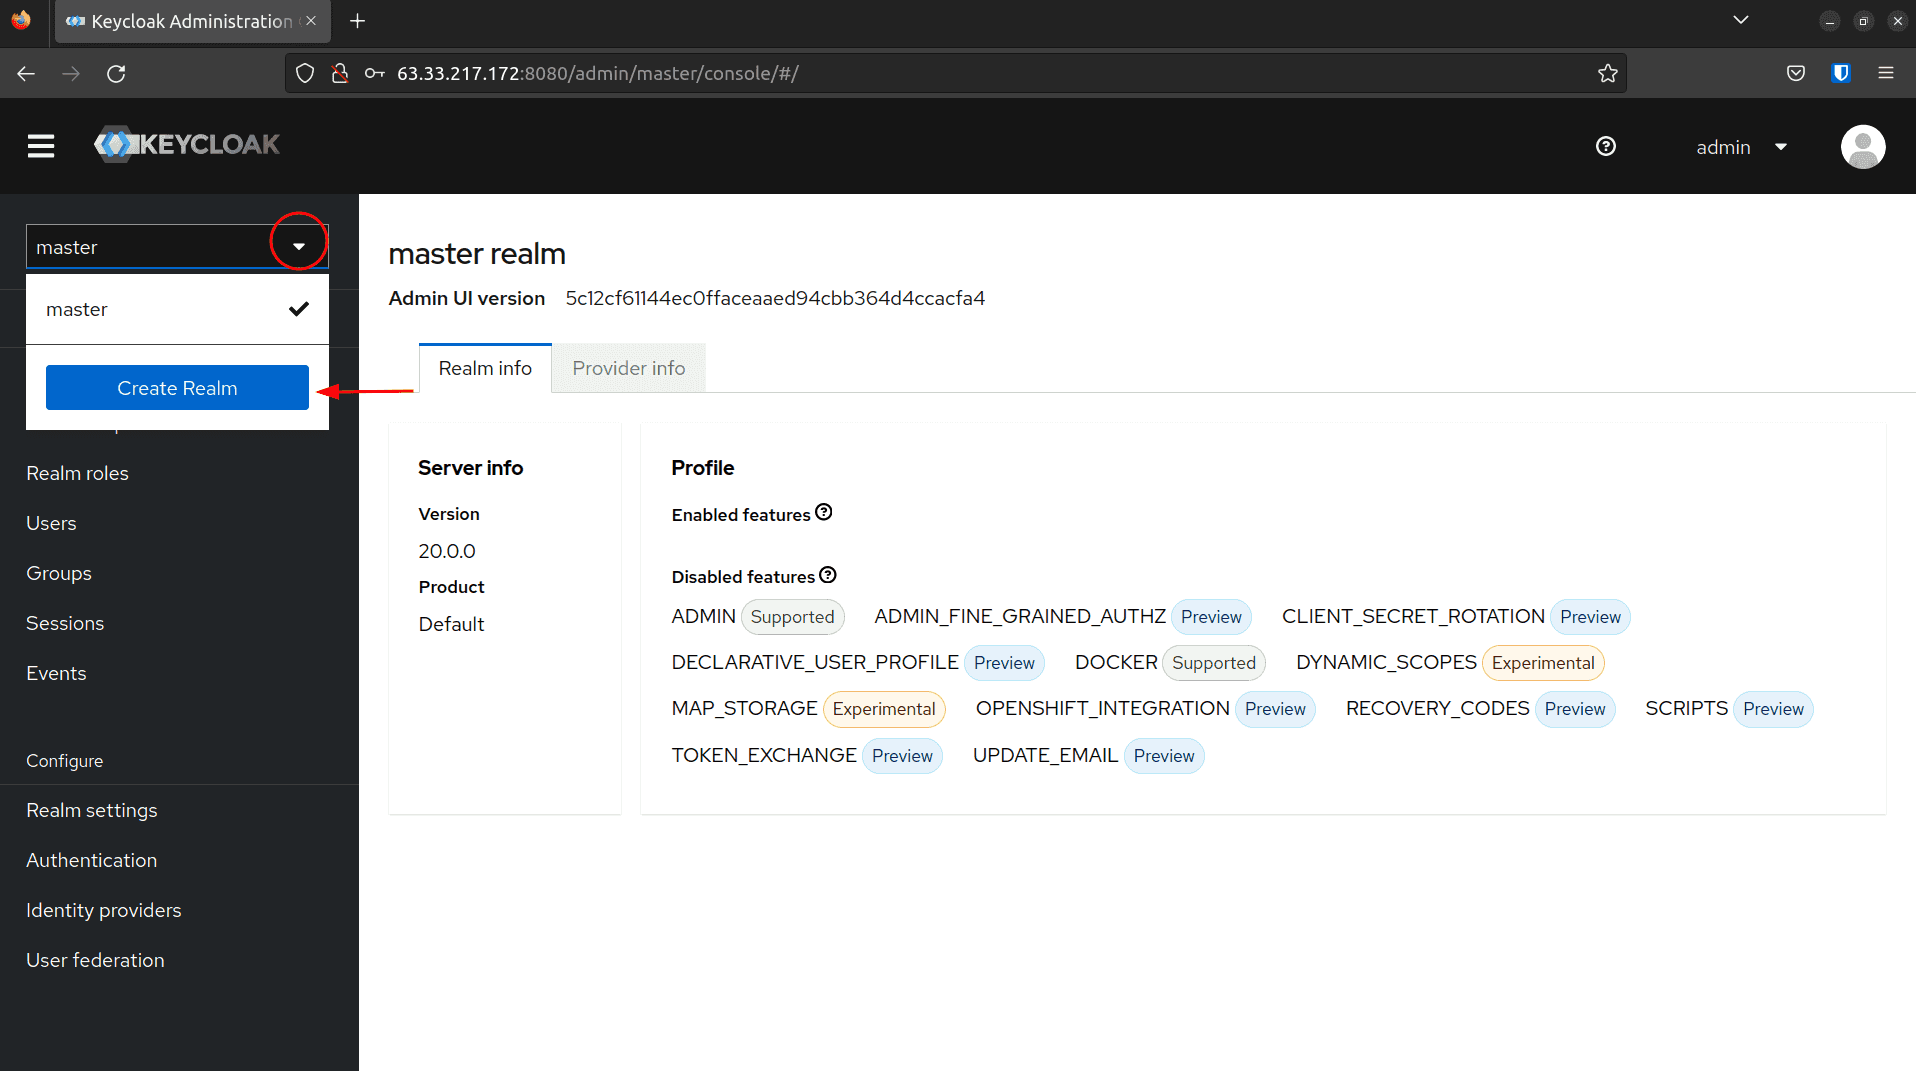
Click on on the dropdown within the top-left nook the place it says grasp, then click on on Create Realm:
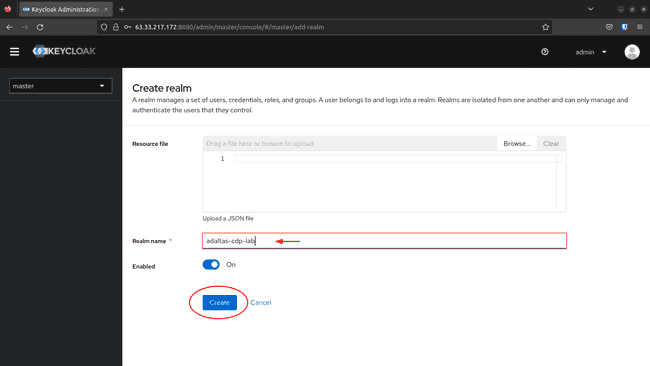
-
Fill the title and click on Create:
-
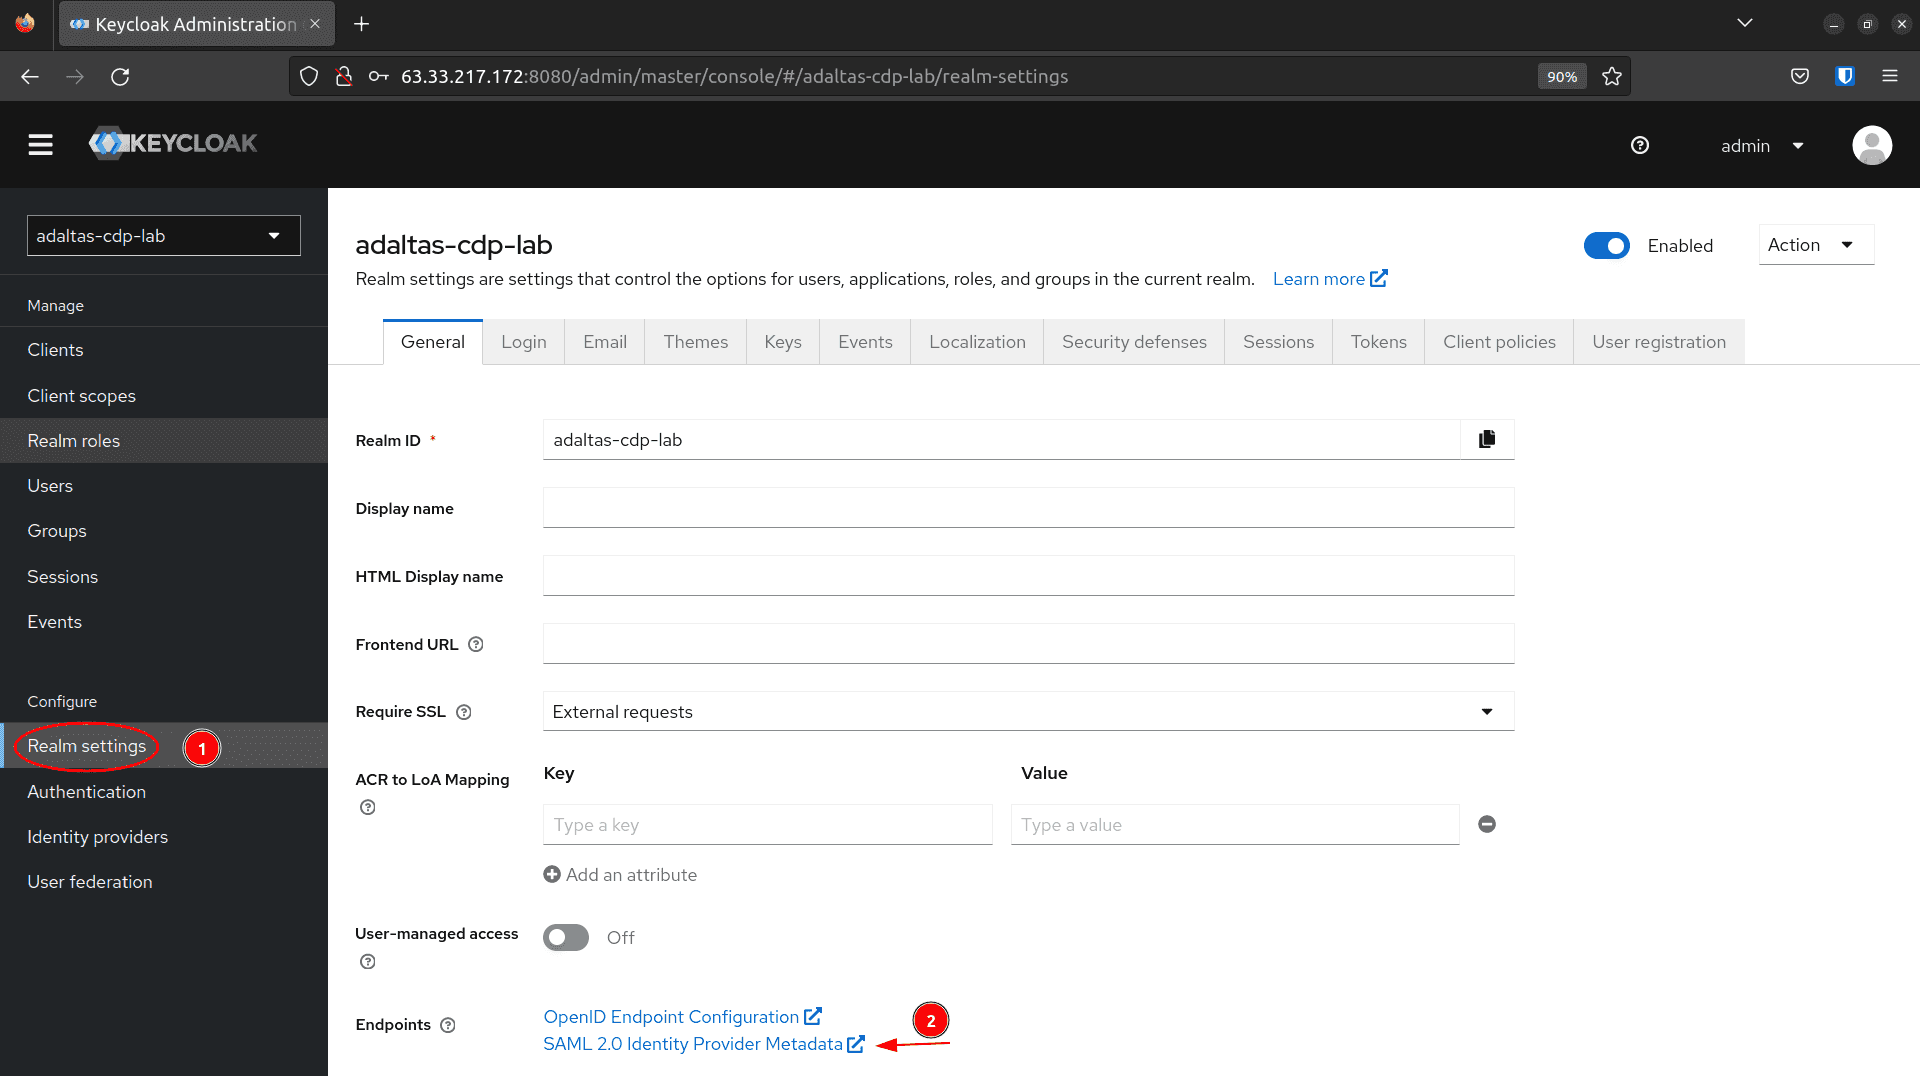
Navigate to Realm settings and click on on SAML 2.0 Identification Supplier Metadata:
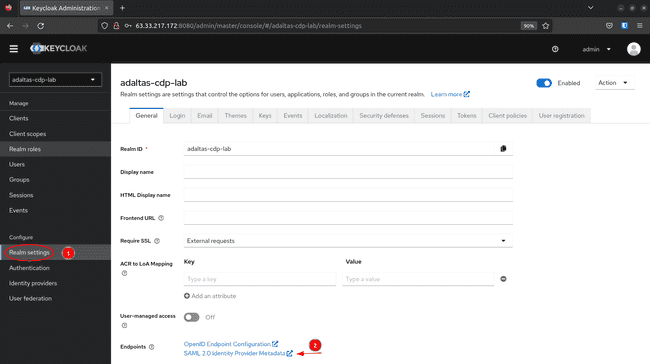
-
This open one other tab with the SAML metadata required to register the Realm as an IdP in CDP:
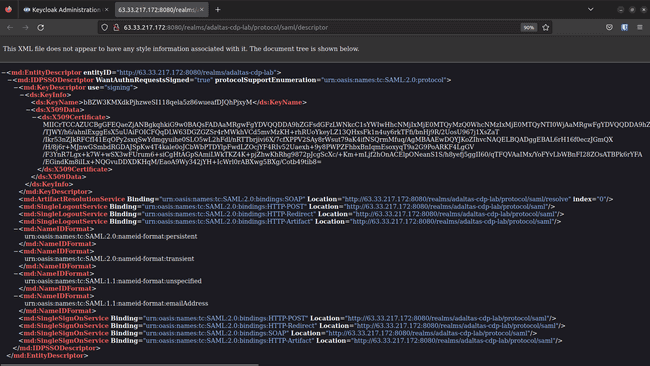
-
Obtain this file in xml format. Proper click on > Save Web page As… > saml_metada.xml:

-
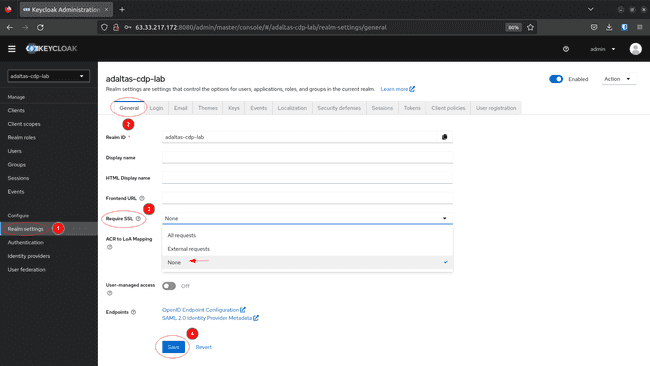
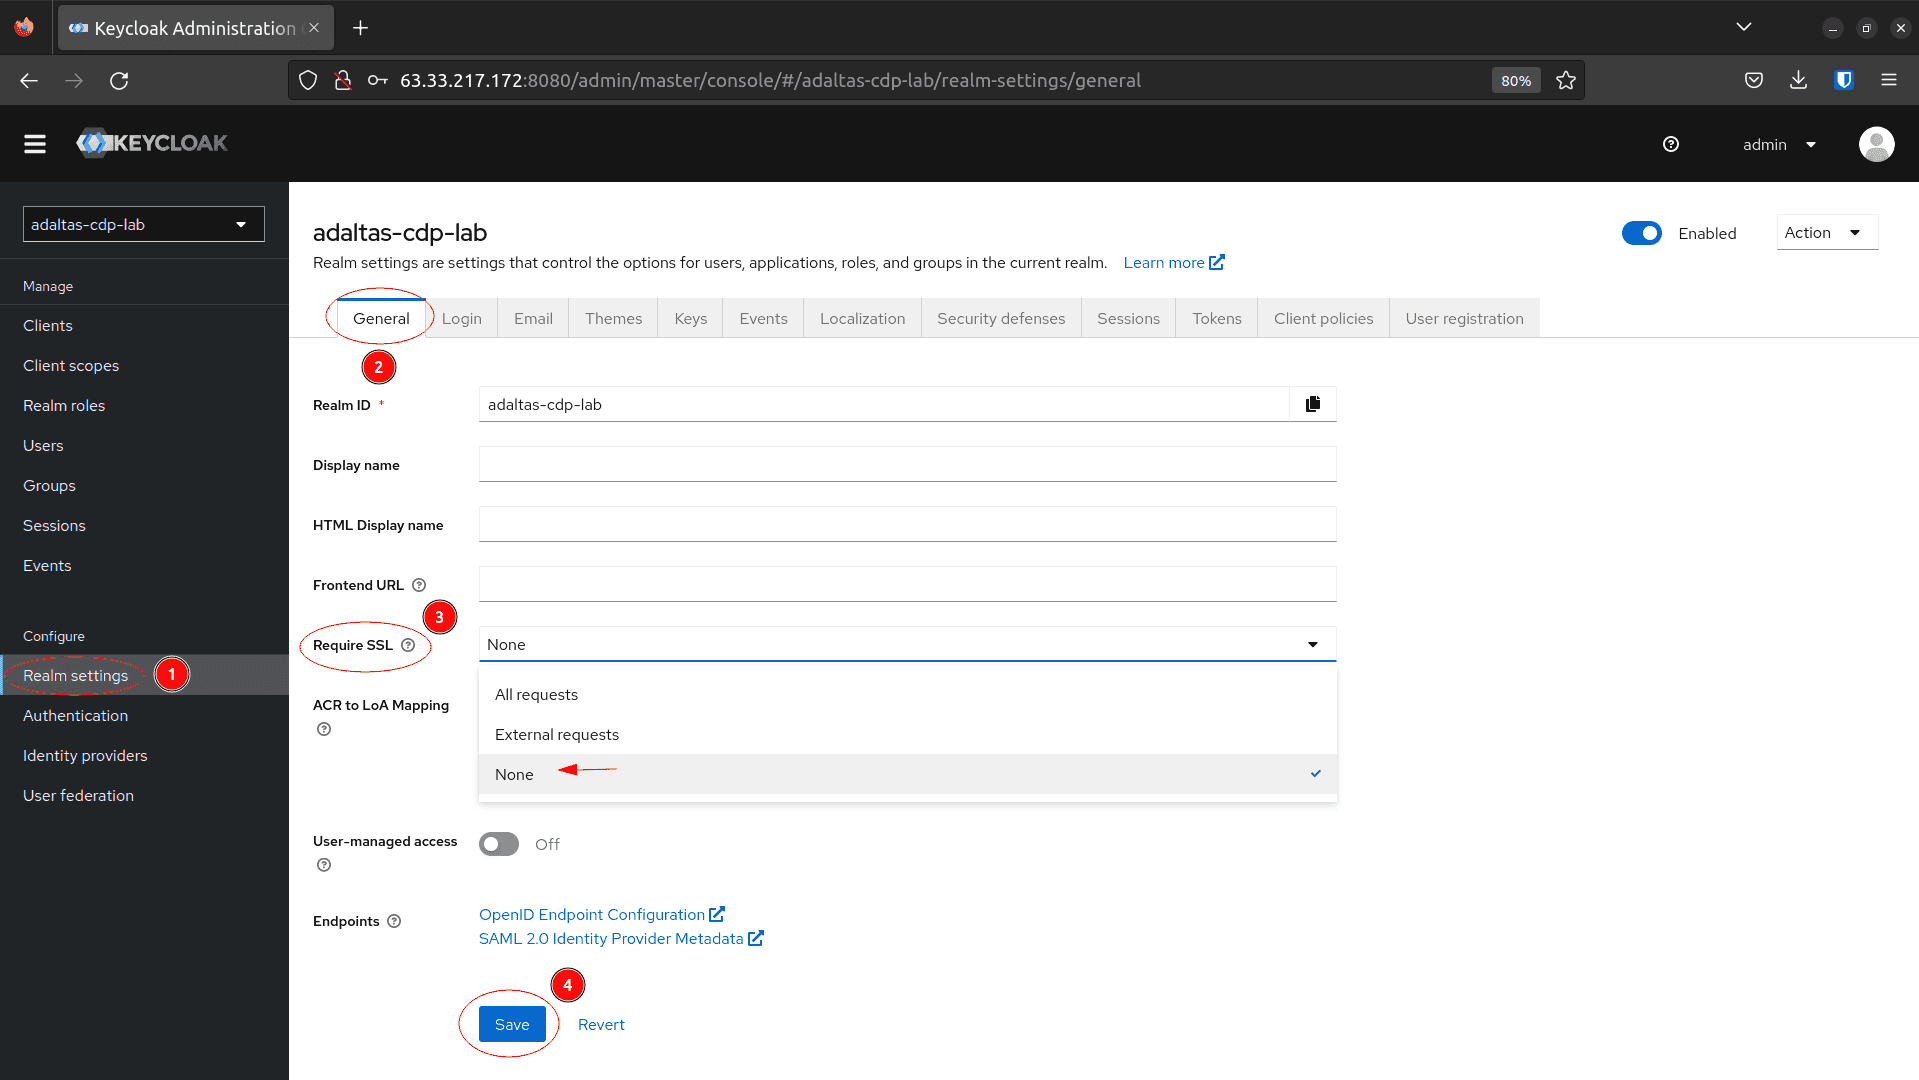
To disable the SSL requirement: return to Realm settings choose the Basic tab, set Required SSL to None and click on on Save:


Registering Keycloak in CDP
On this step Keycloak is registered as an id supplier in CDP. This requires the beforehand downloaded SAML metadata file.
As a reminder, you want Account administrator or PowerUser roles in your CDP account to finish this course of.
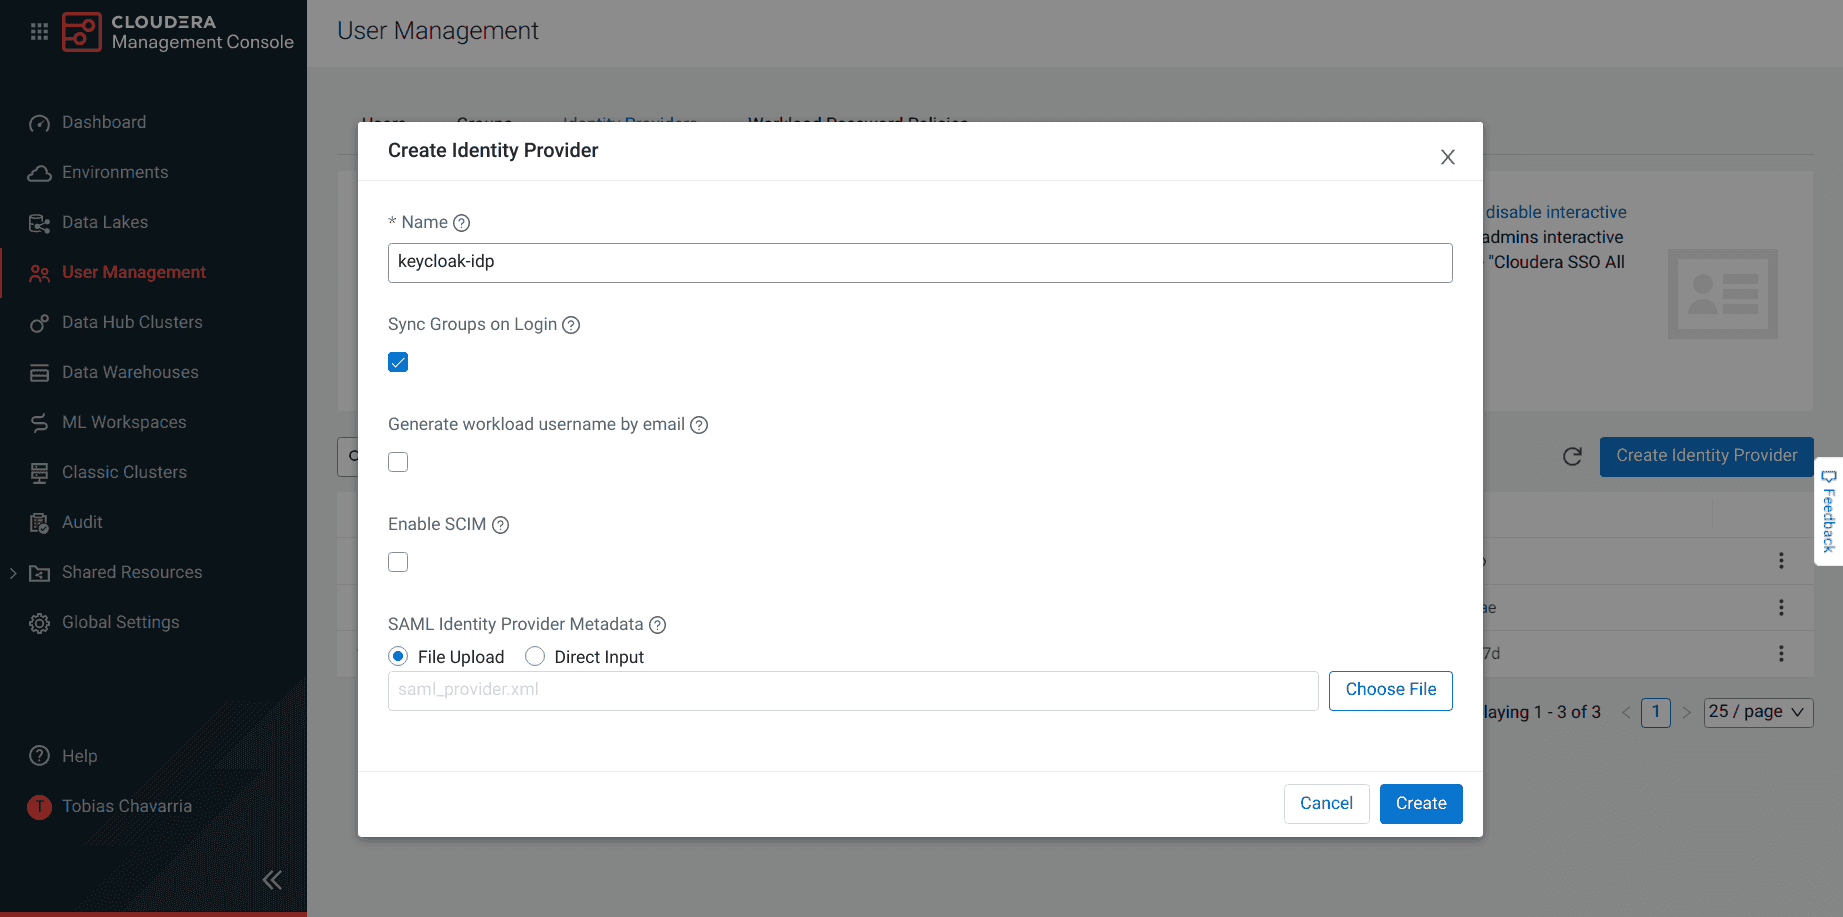
To create the Identification Supplier in CDP, the next steps are wanted.
-
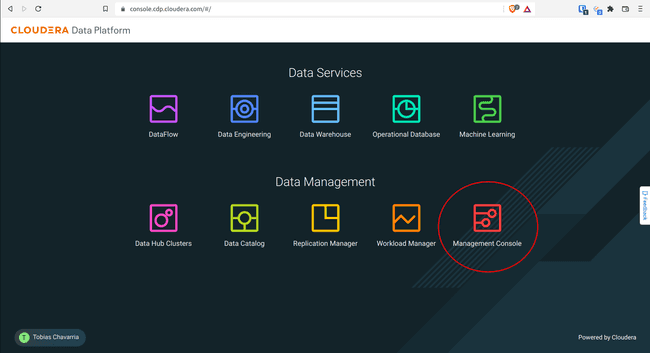
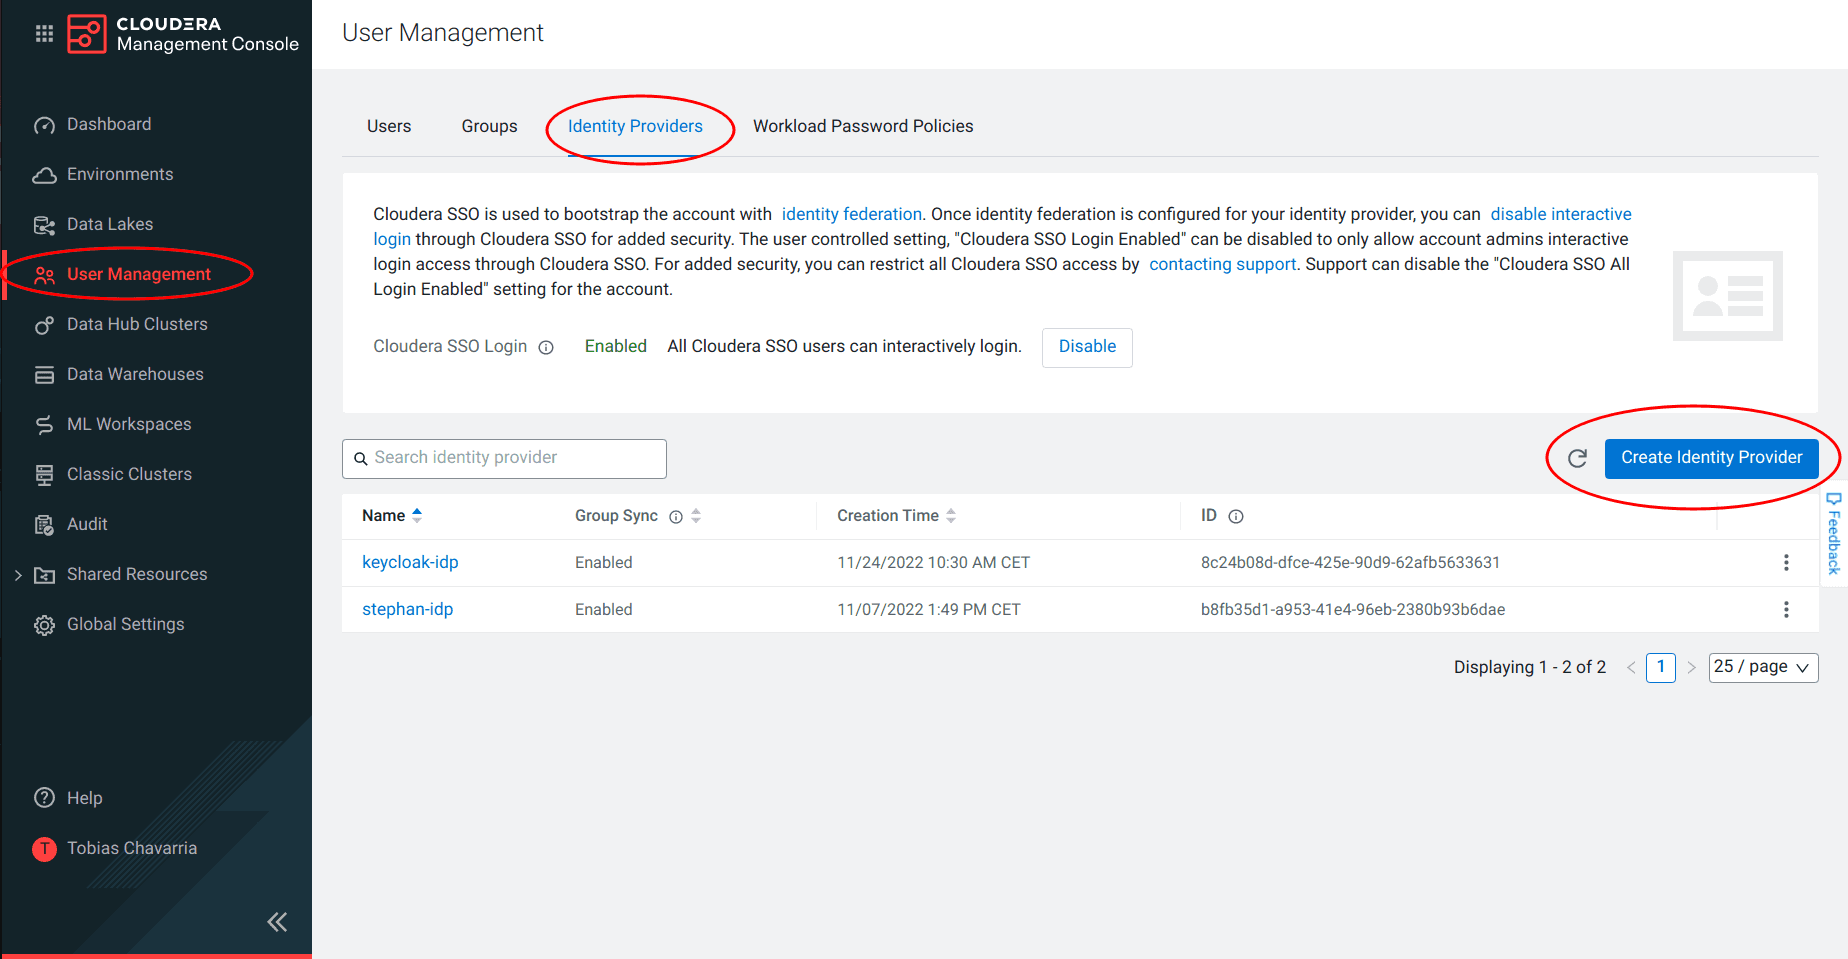
Entry your CDP Console and choose Administration Console:
-
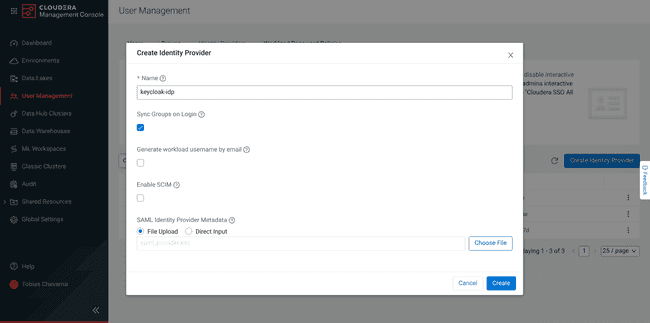
Navigate to Person Administration > Identification Suppliers > Create Identification Supplier:
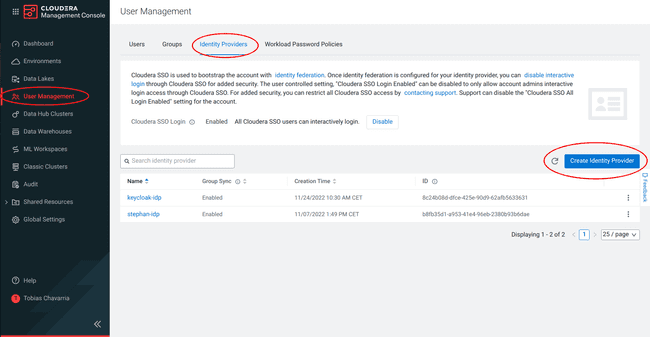
-
Create Identification Supplier:
- Enter the title you wish to use for the CDP id supplier.
- Test the Sync Teams on Login possibility: This synchronize the person group membership in CDP with the person group membership in Keycloak.
- In Supplier Metadata, choose File Add and add the
saml_provider.xmldownloaded within the earlier step. - Click on Create.
-
Copy the
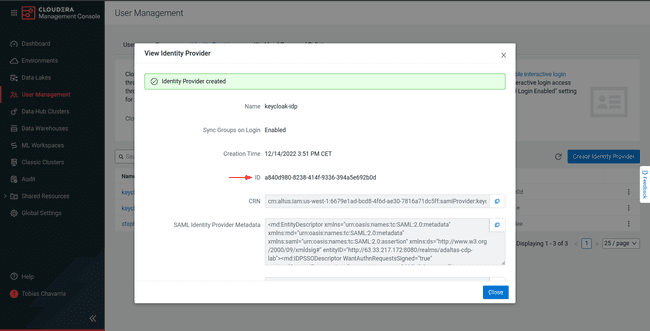

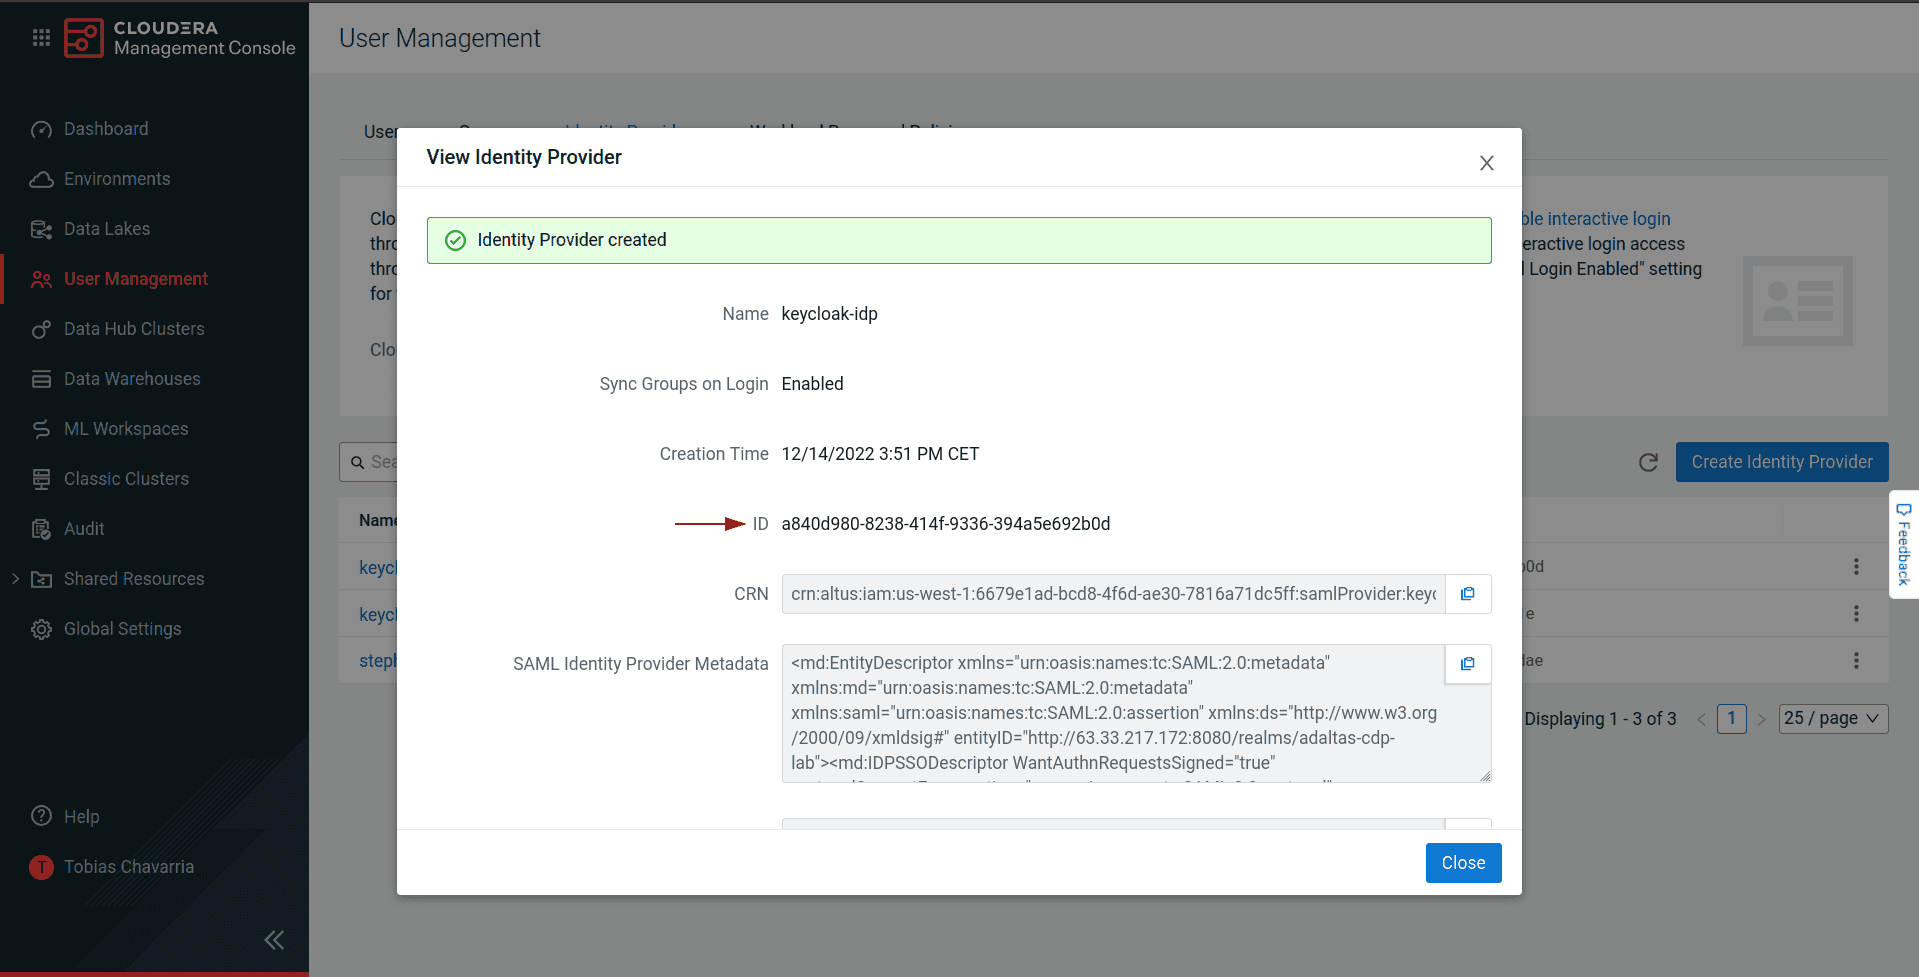
This
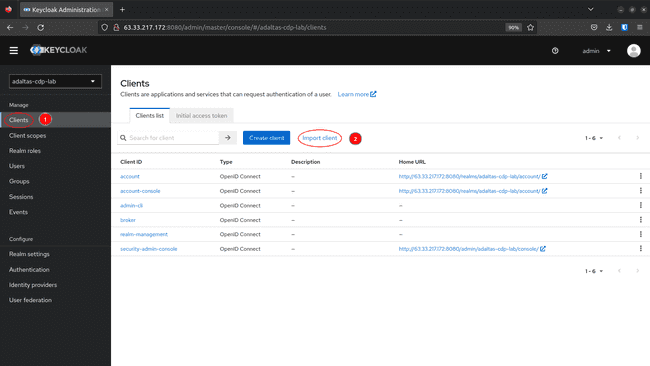
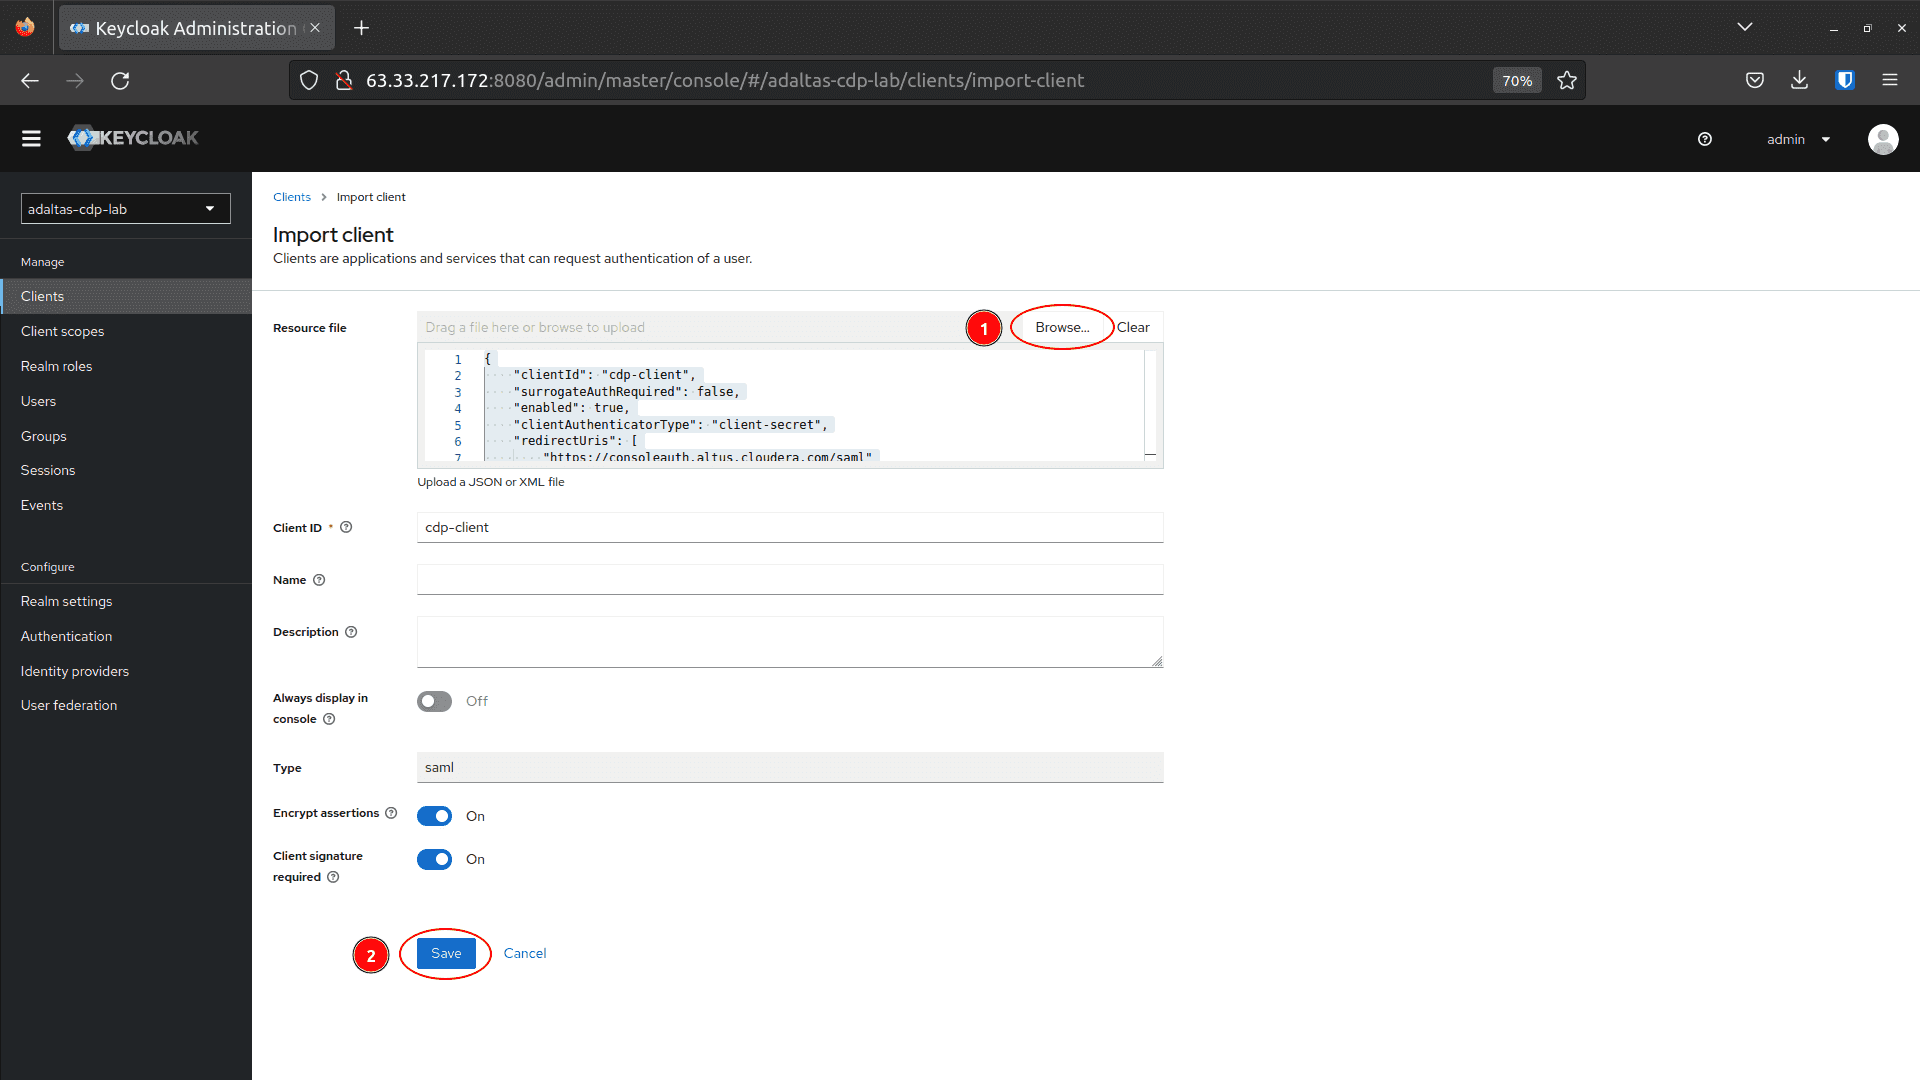
Create the CDP Shopper on Keycloak
On this step, the CDP Management Airplane consumer is created in our Keycloak deployment.
There are two methods to create a consumer in Keycloak:
- Utilizing entity descriptor: import the consumer utilizing a normal SAML Entity Descriptor json file.
- Manually by way of the Keycloak UI utilizing the CDP SAML Service Supplier Metadata obtainable within the id supplier created within the earlier step. (Test Managing OpenID Connect and SAML Clients for particulars.)
On this case, we use a SAML Entity Descriptor file: cdp-client.
Comment: The cdp-client was discovered on this article: How to configure Single Sign-On (SSO) for CDP Public Cloud the open-source way with Keycloak.
The writer clarifies that this file, is neither official nor supplied by Cloudera however consists of the required settings, SAML assertion, and signing certificates required by CDP.
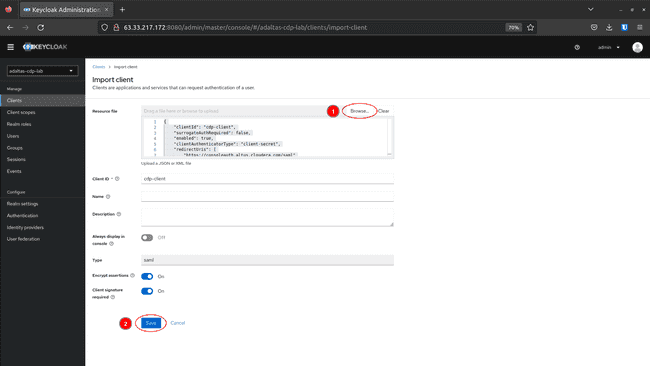
To create a SAML 2.0 consumer in Keycloak by importing a configuration file observe these steps:
-
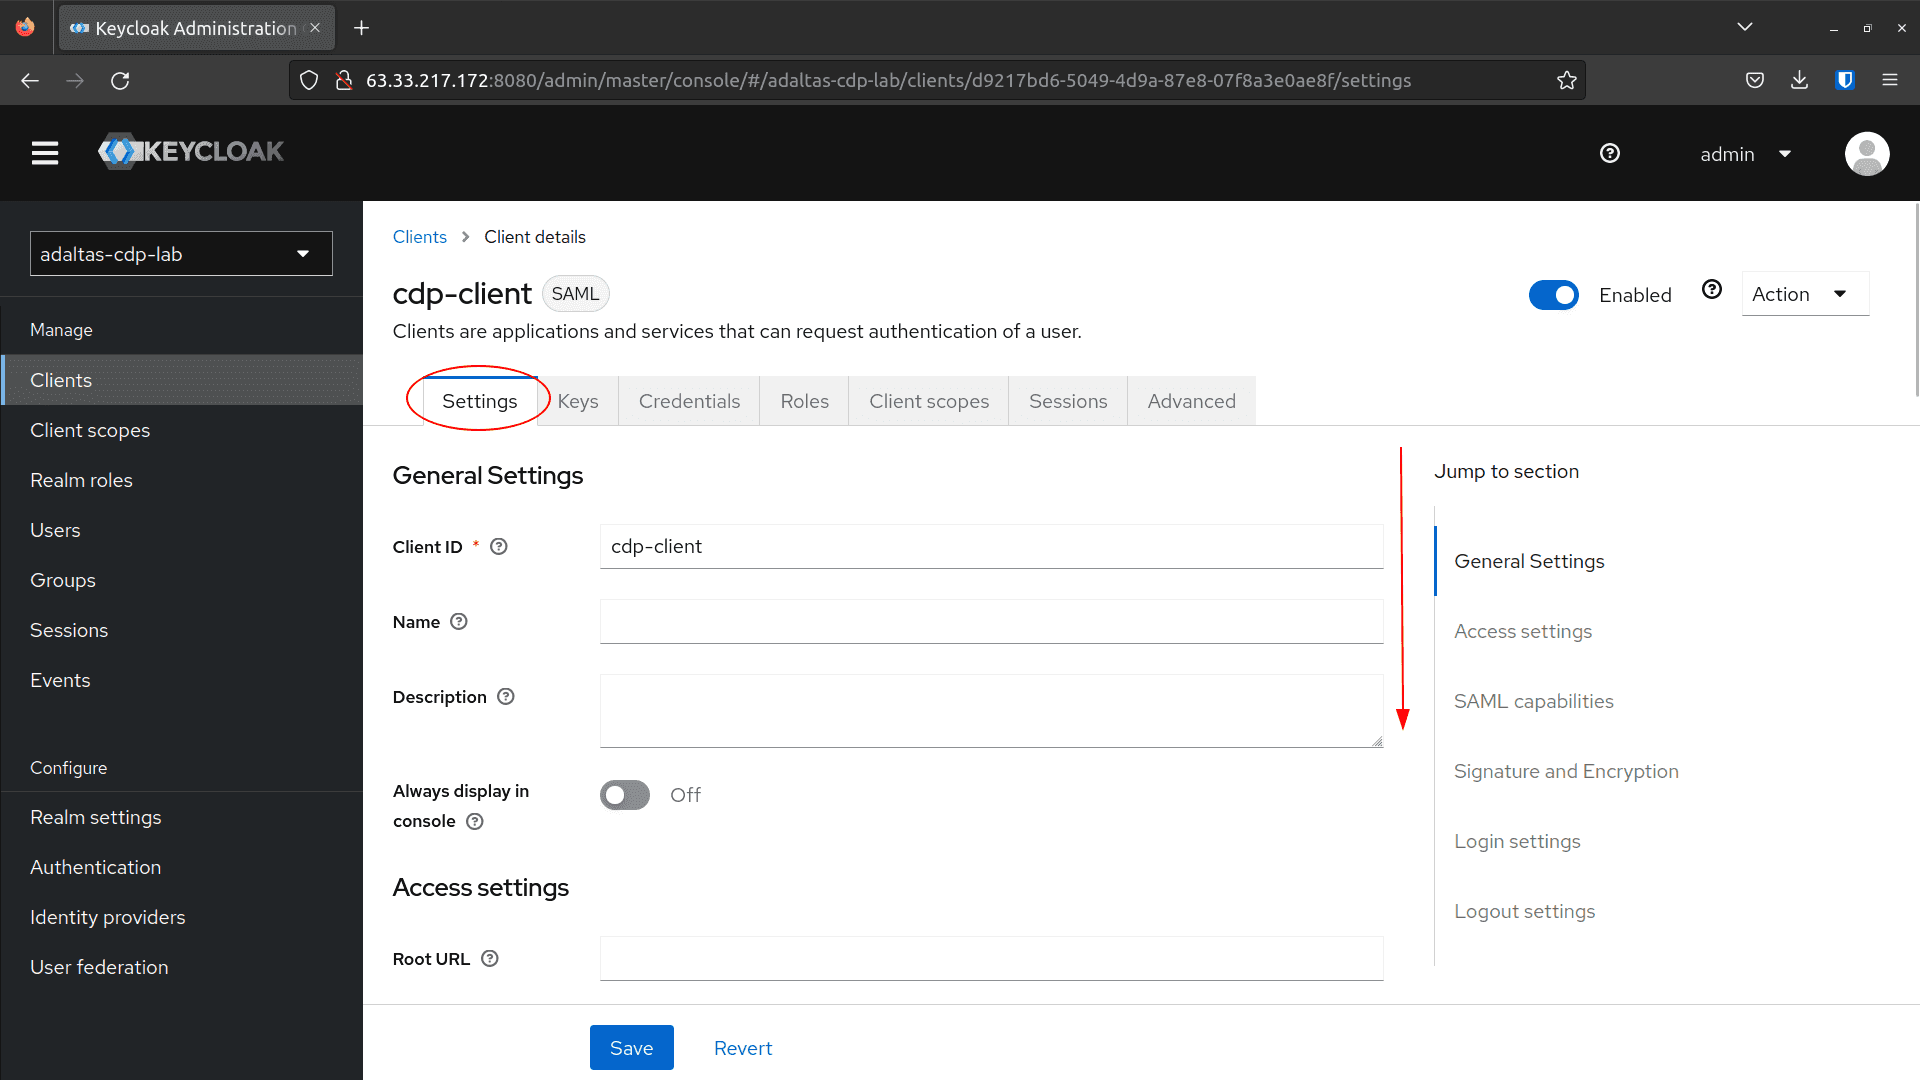
Within the Keycloak Admin Console navigate to Shoppers and click on Create
-
Click on Browse and cargo the cdp-client file. This mechanically updates the Shopper ID and Sort parameters. Click on Save
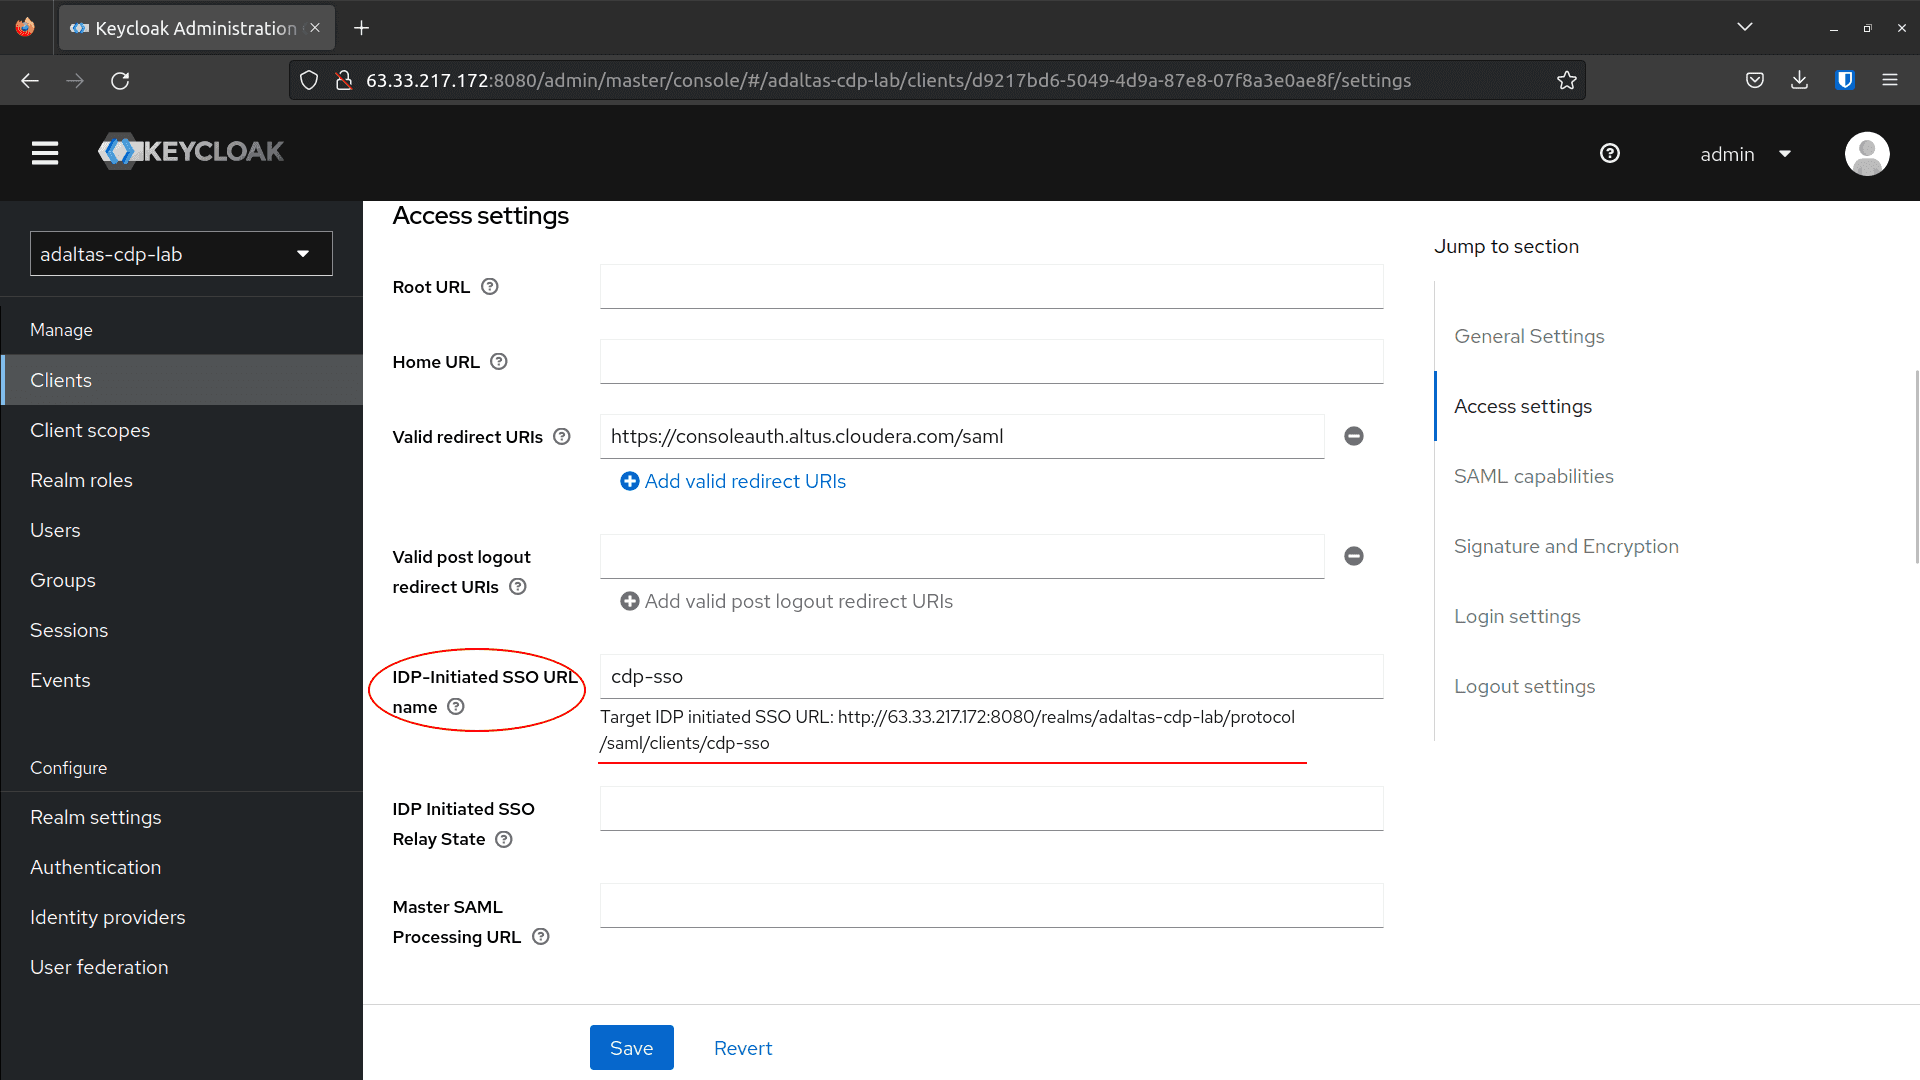
-
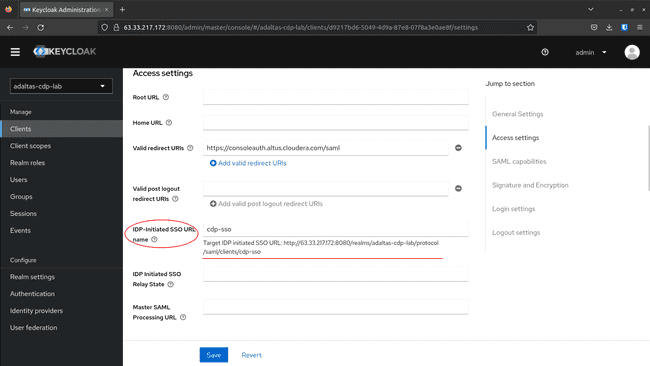
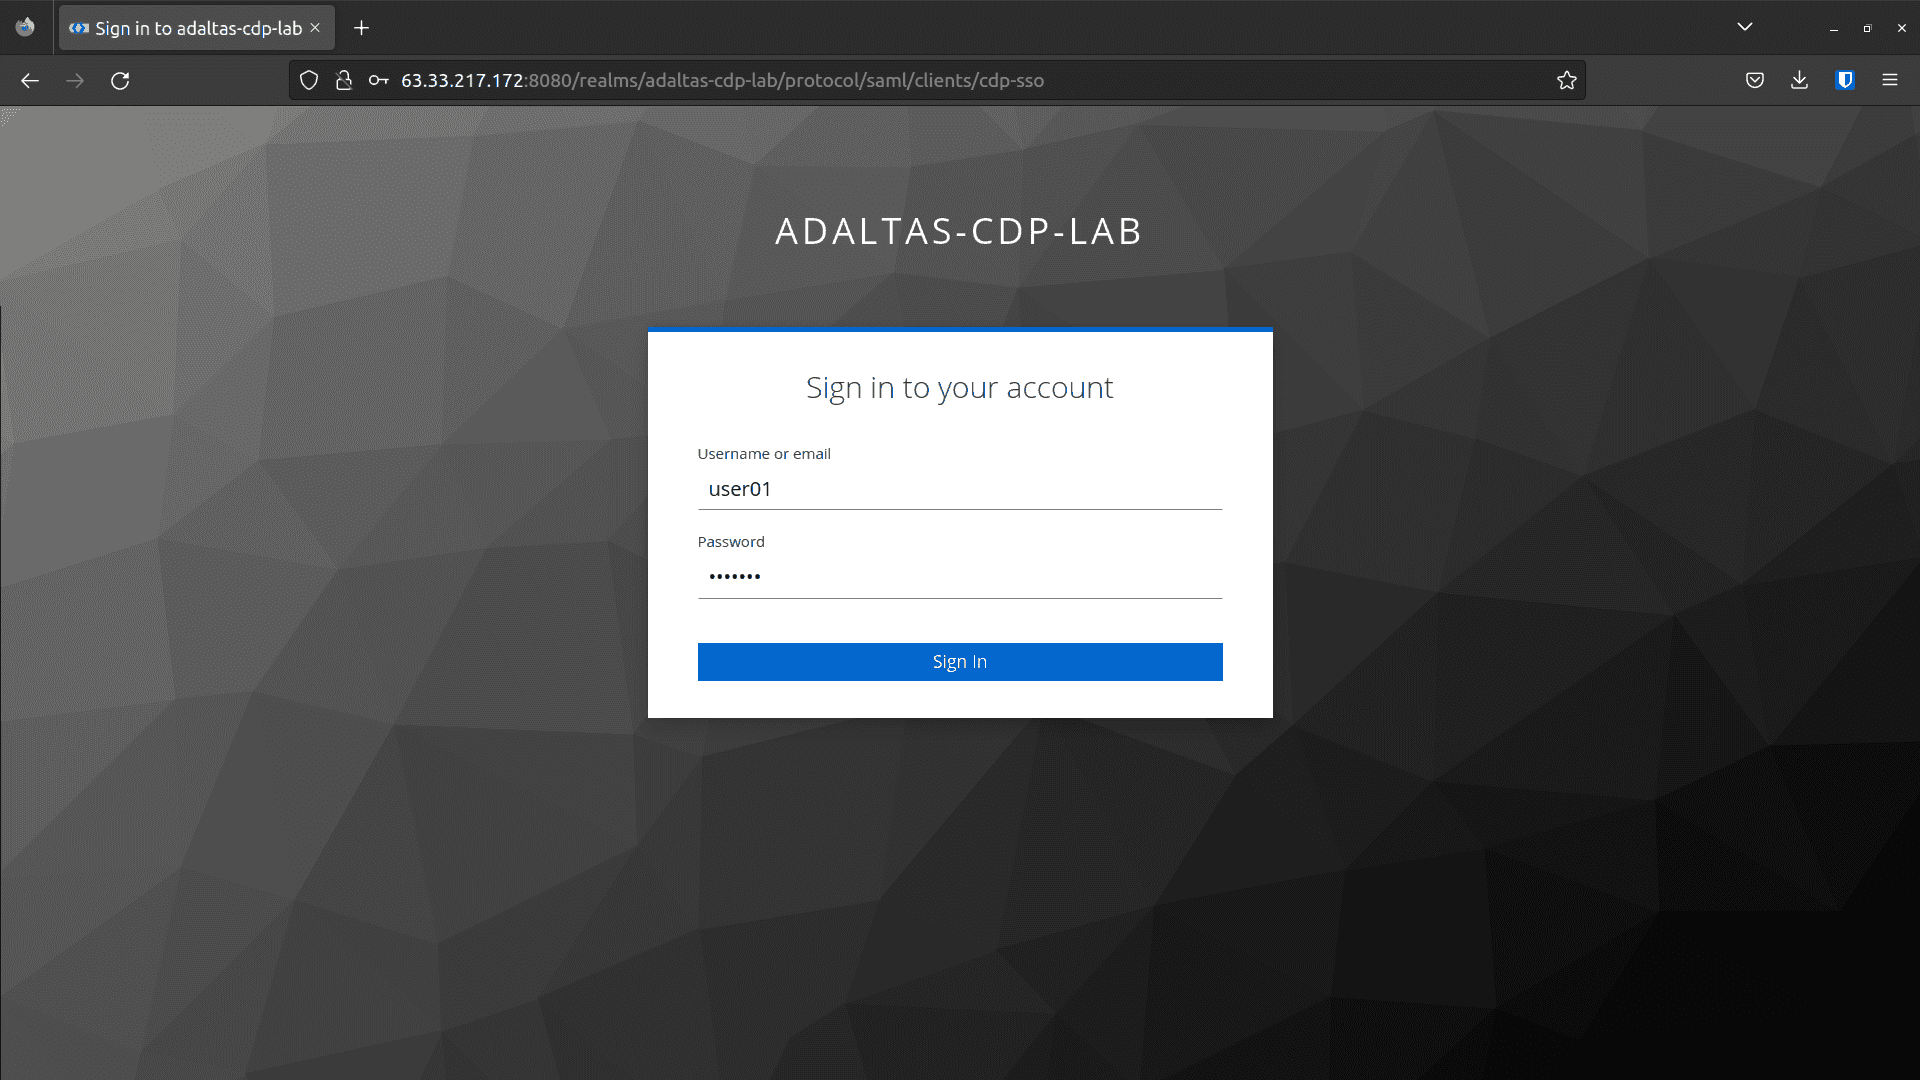
To get the Login Web page URL, navigate to the Settings tab and scroll down till the IDP Initiated SSO URL Title variable.
It’d appear like this:
http://.:8080/realms/adaltas-cdp-lab/protocol/saml/purchasers/cdp-sso
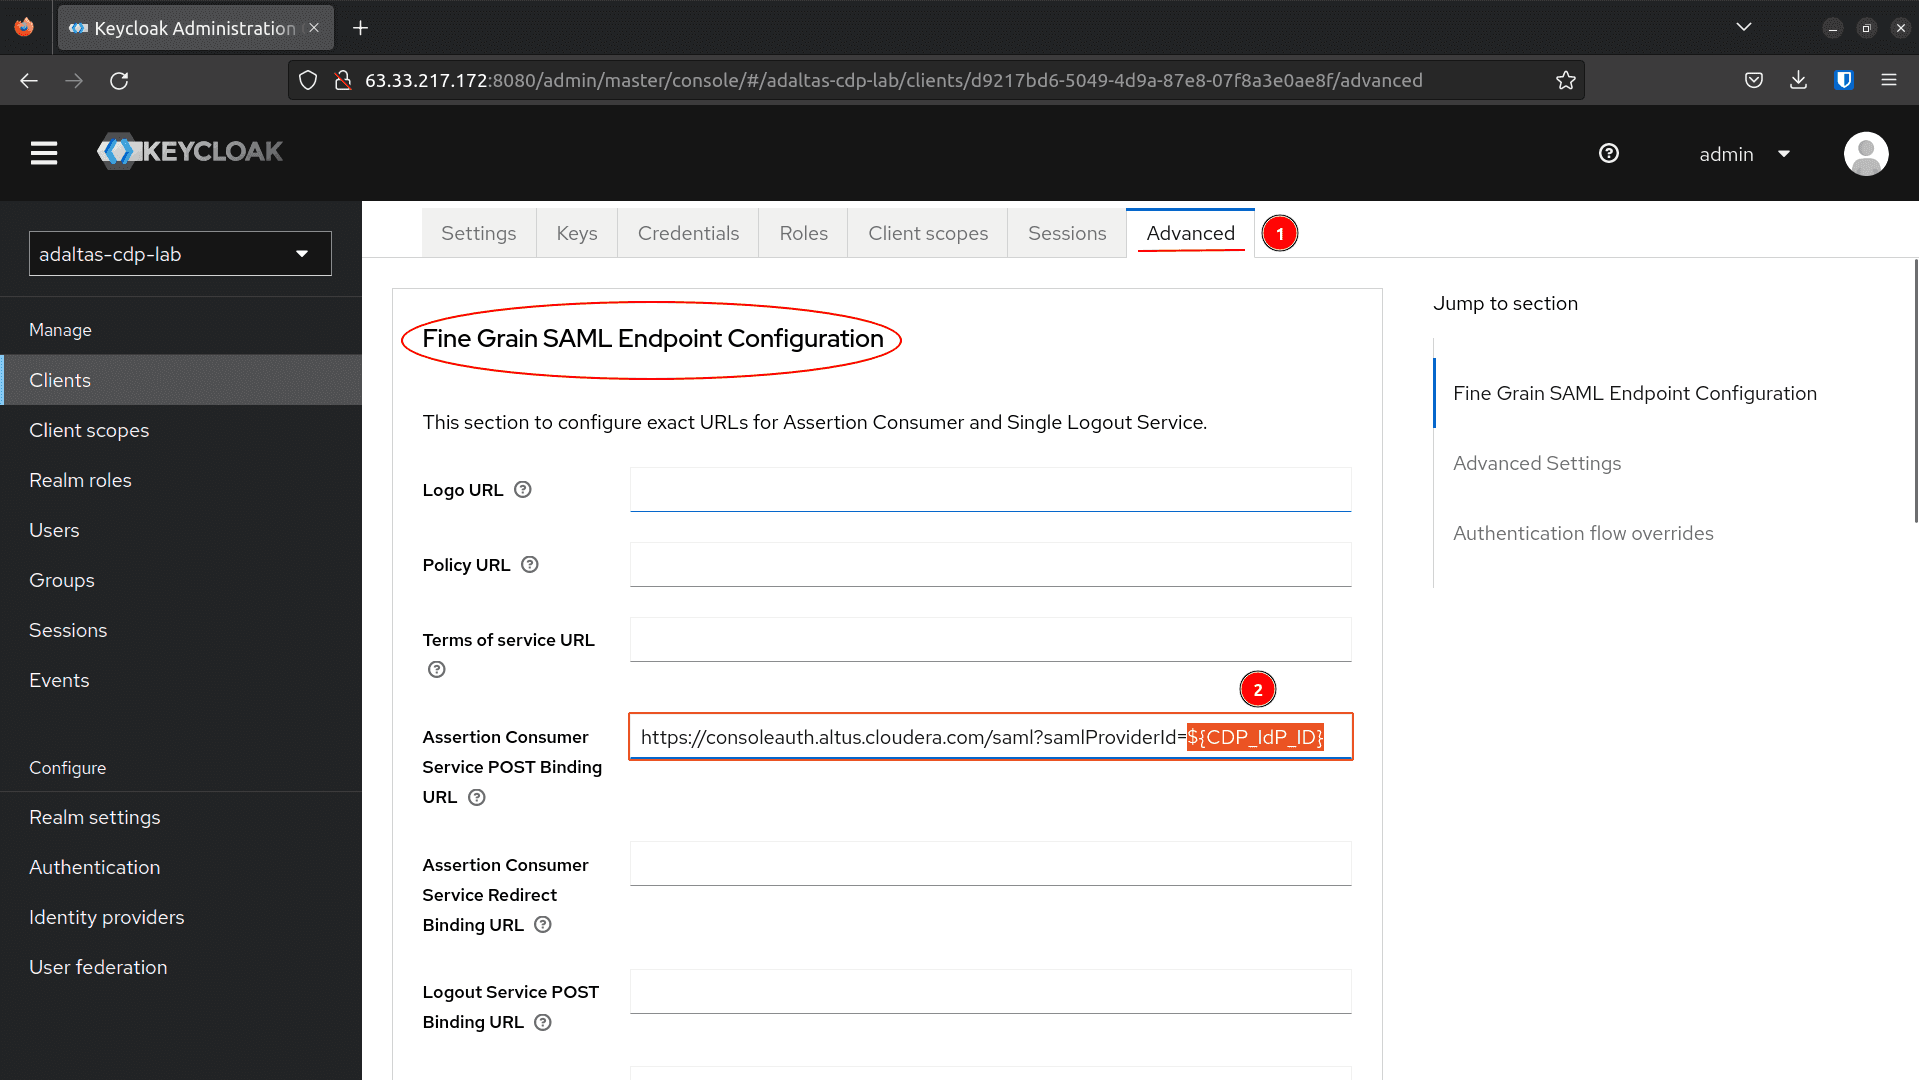
-
Navigate to Superior tab, substitute
${CDP_IdP_ID}with the Identification Supplier ID generated by CDP within the earlier step. Scroll down and click on Save

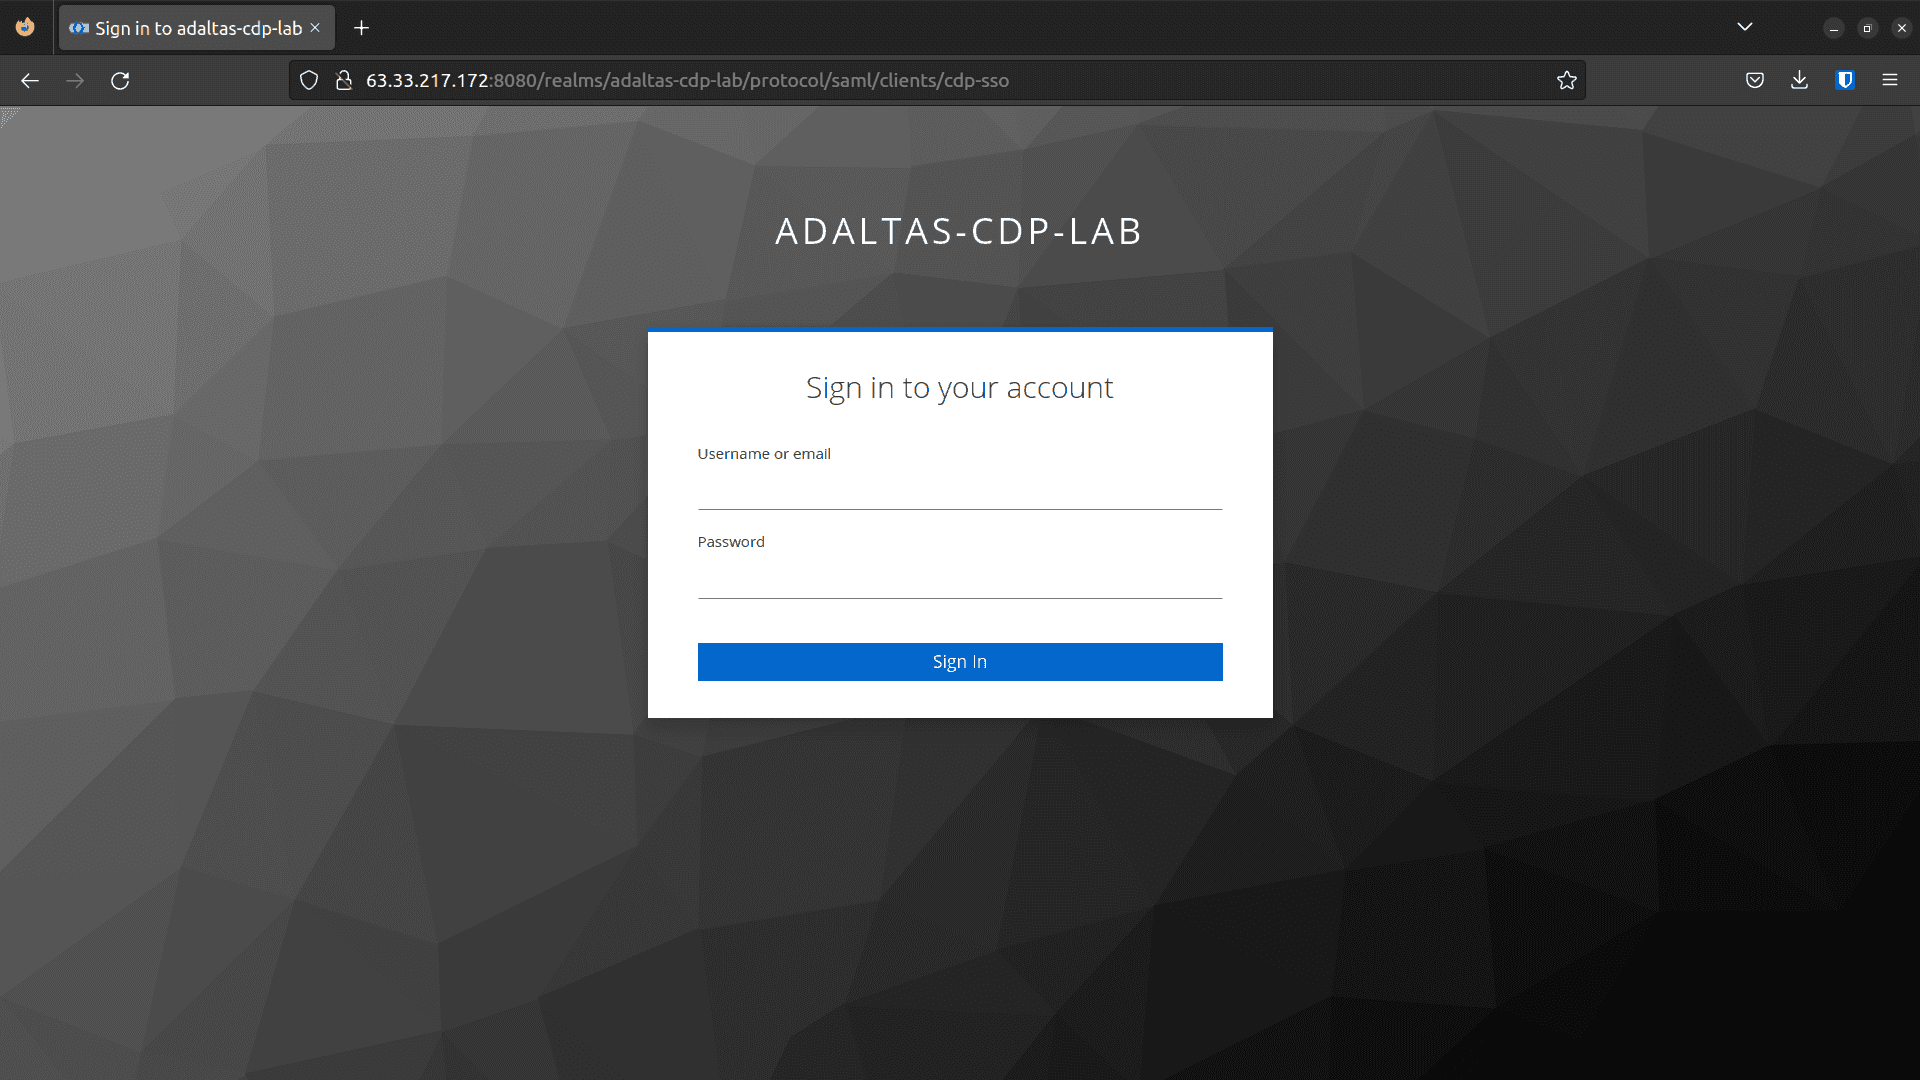
-
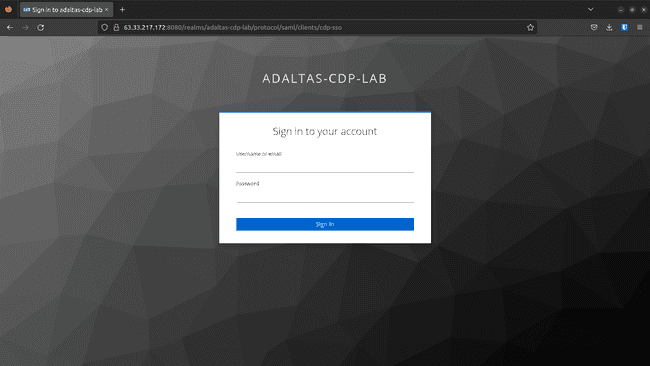
Check the Login Web page URL:

Handle Group and Customers
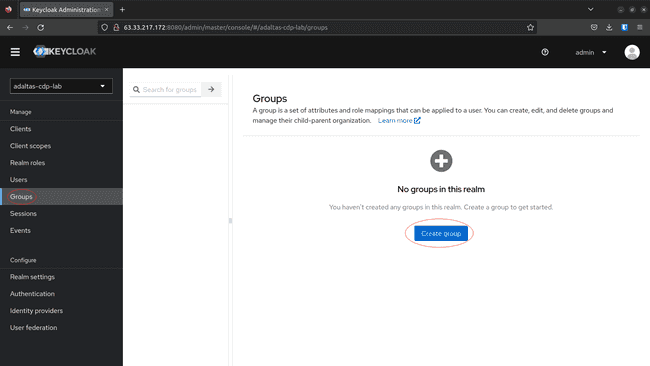
Now that the Realm and the consumer are prepared, we create/handle customers and teams through the Admin Console.
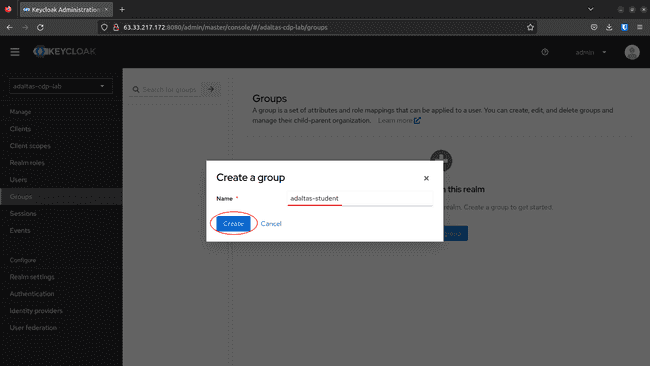
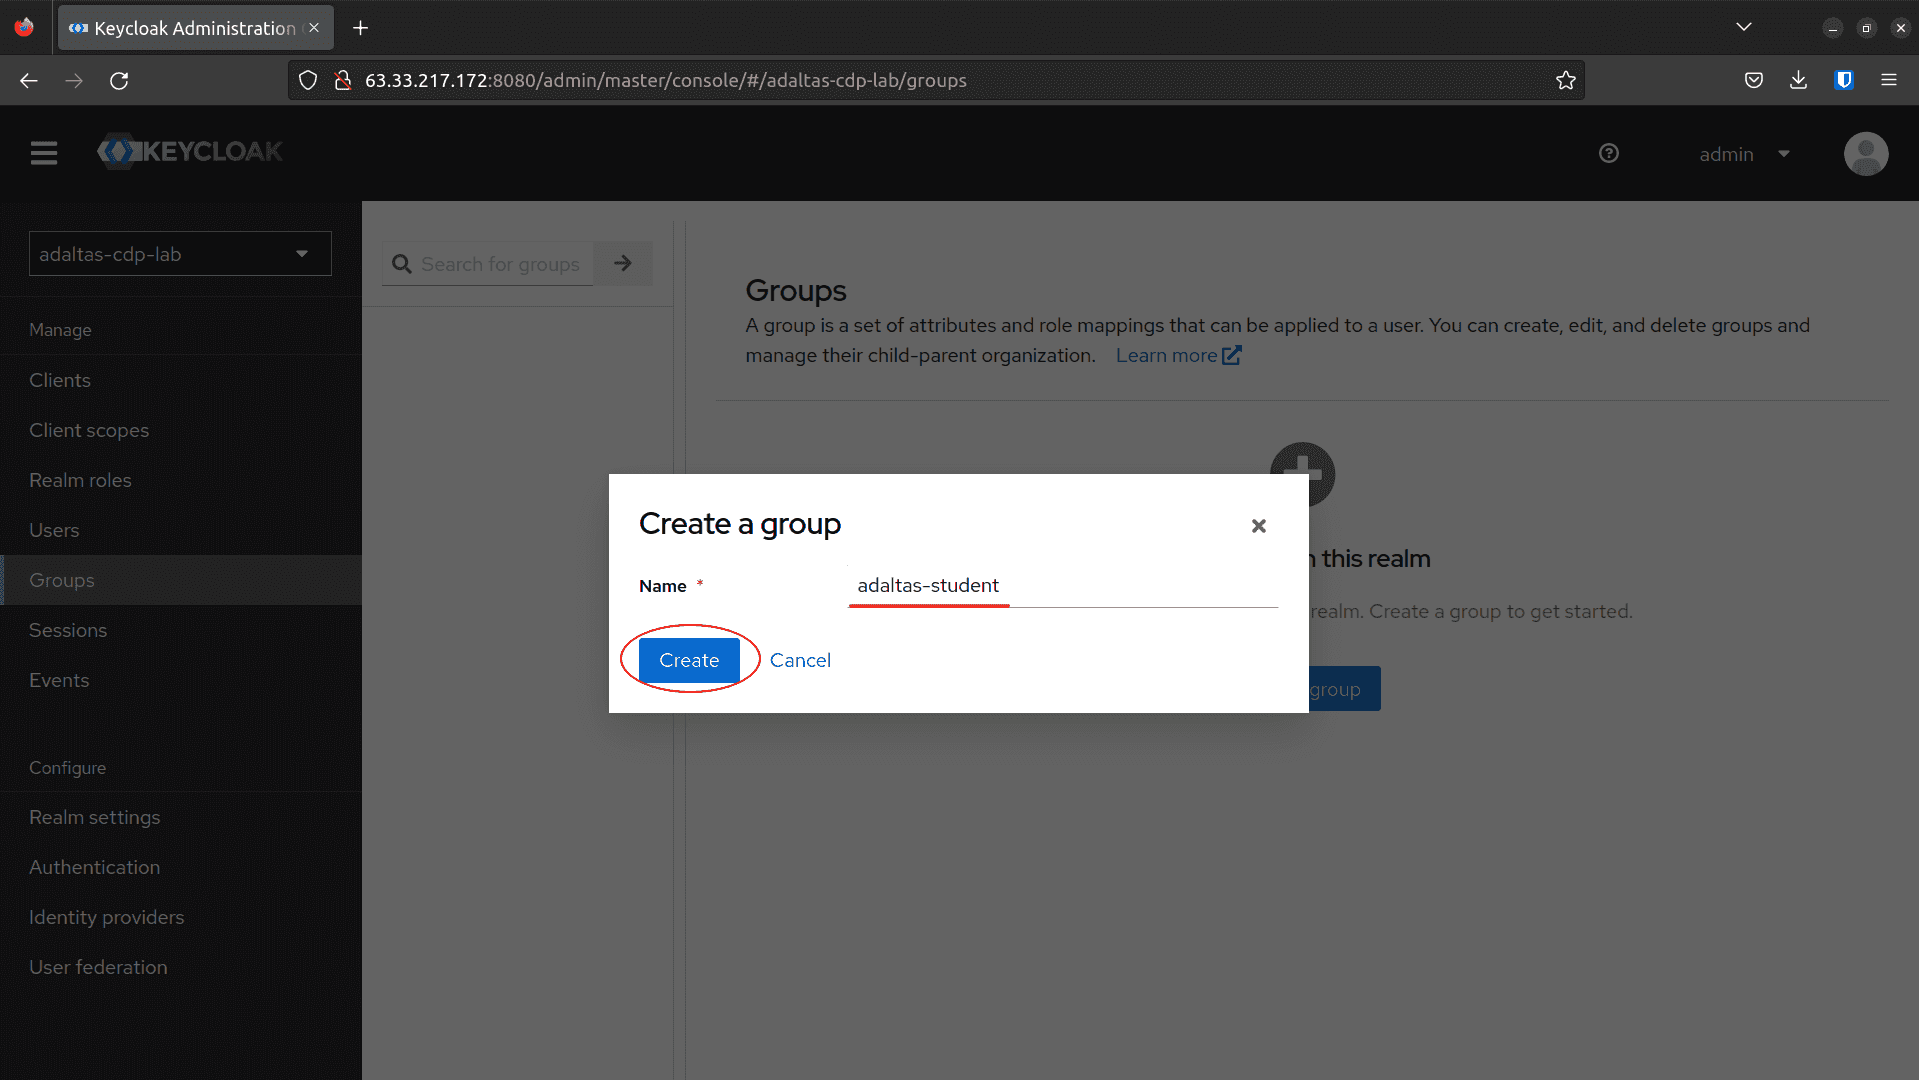
Create a gaggle:
-
Navigate to Teams on the left menu, and click on Create group:
-
Fill the title and click on Save:
Word: Watch out whereas selecting the
GROUP_NAMEsince there’s a checklist of group names that are reserved and subsequently can’t be synchronized to CDP.

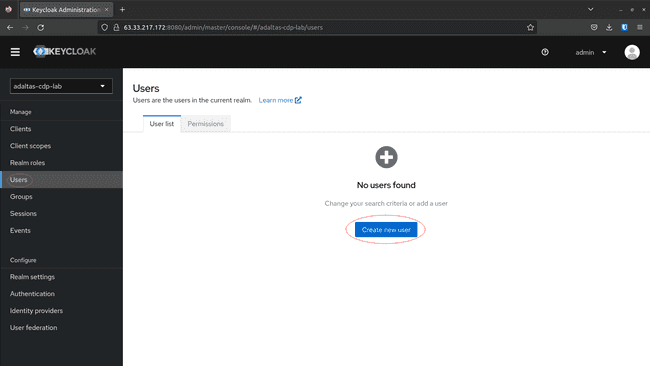
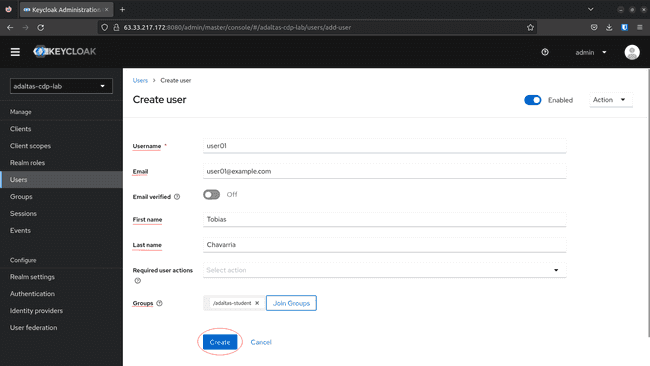
Create a person:
-
Navigate to Customers on the left menu, and click on Create new person:
-
Set the next parameters and click on Create:
- Username
- First Title
- Final Title
- Choose the group created above
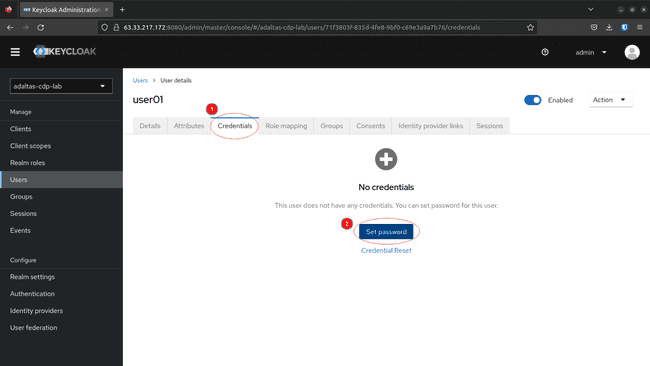
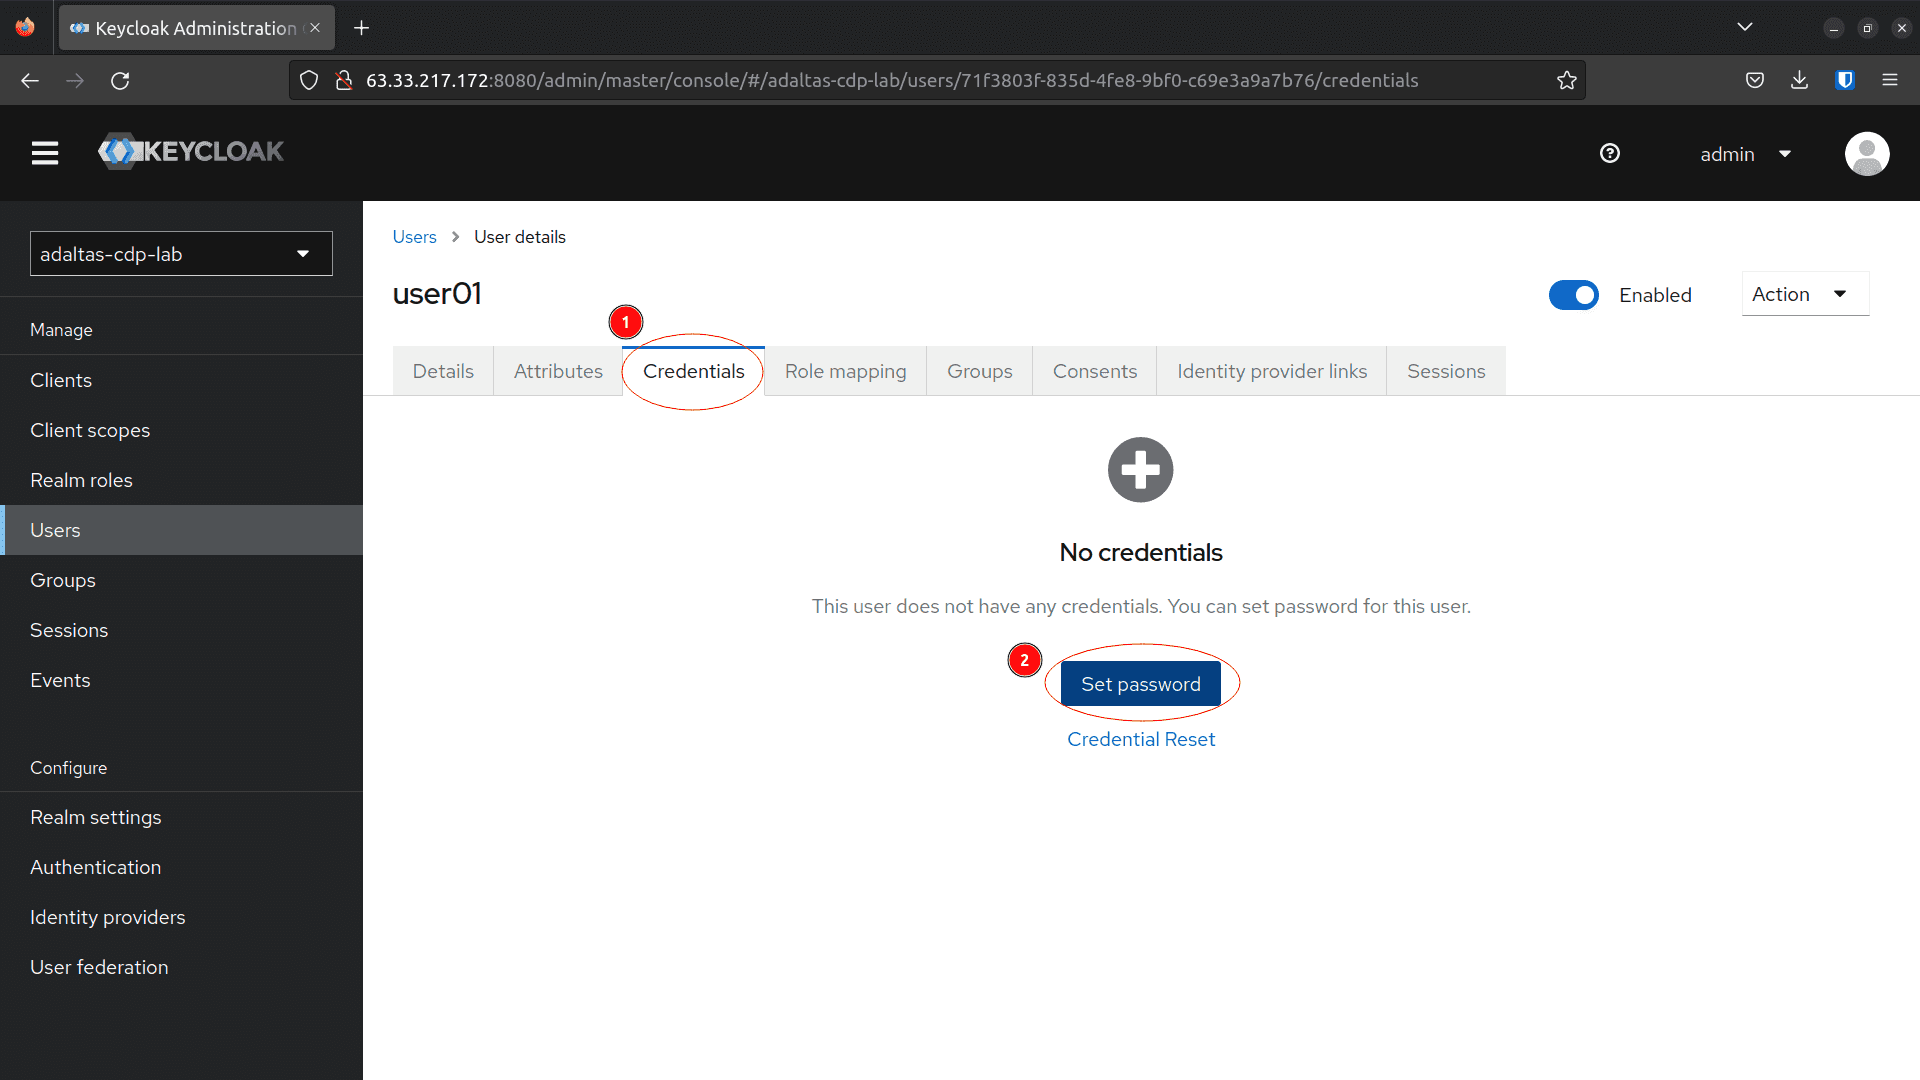
-
To set the password, navigate to Credentials, fill the values an click on Set Password:
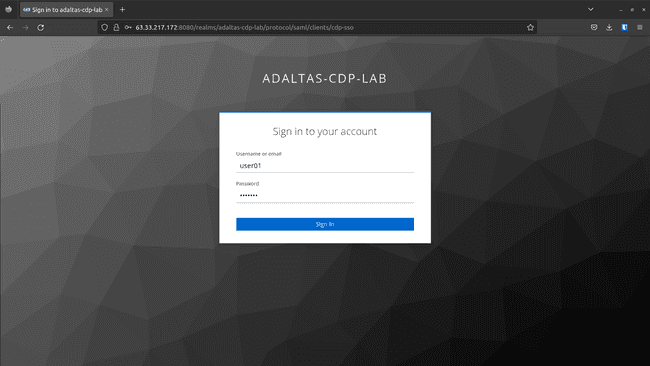
-
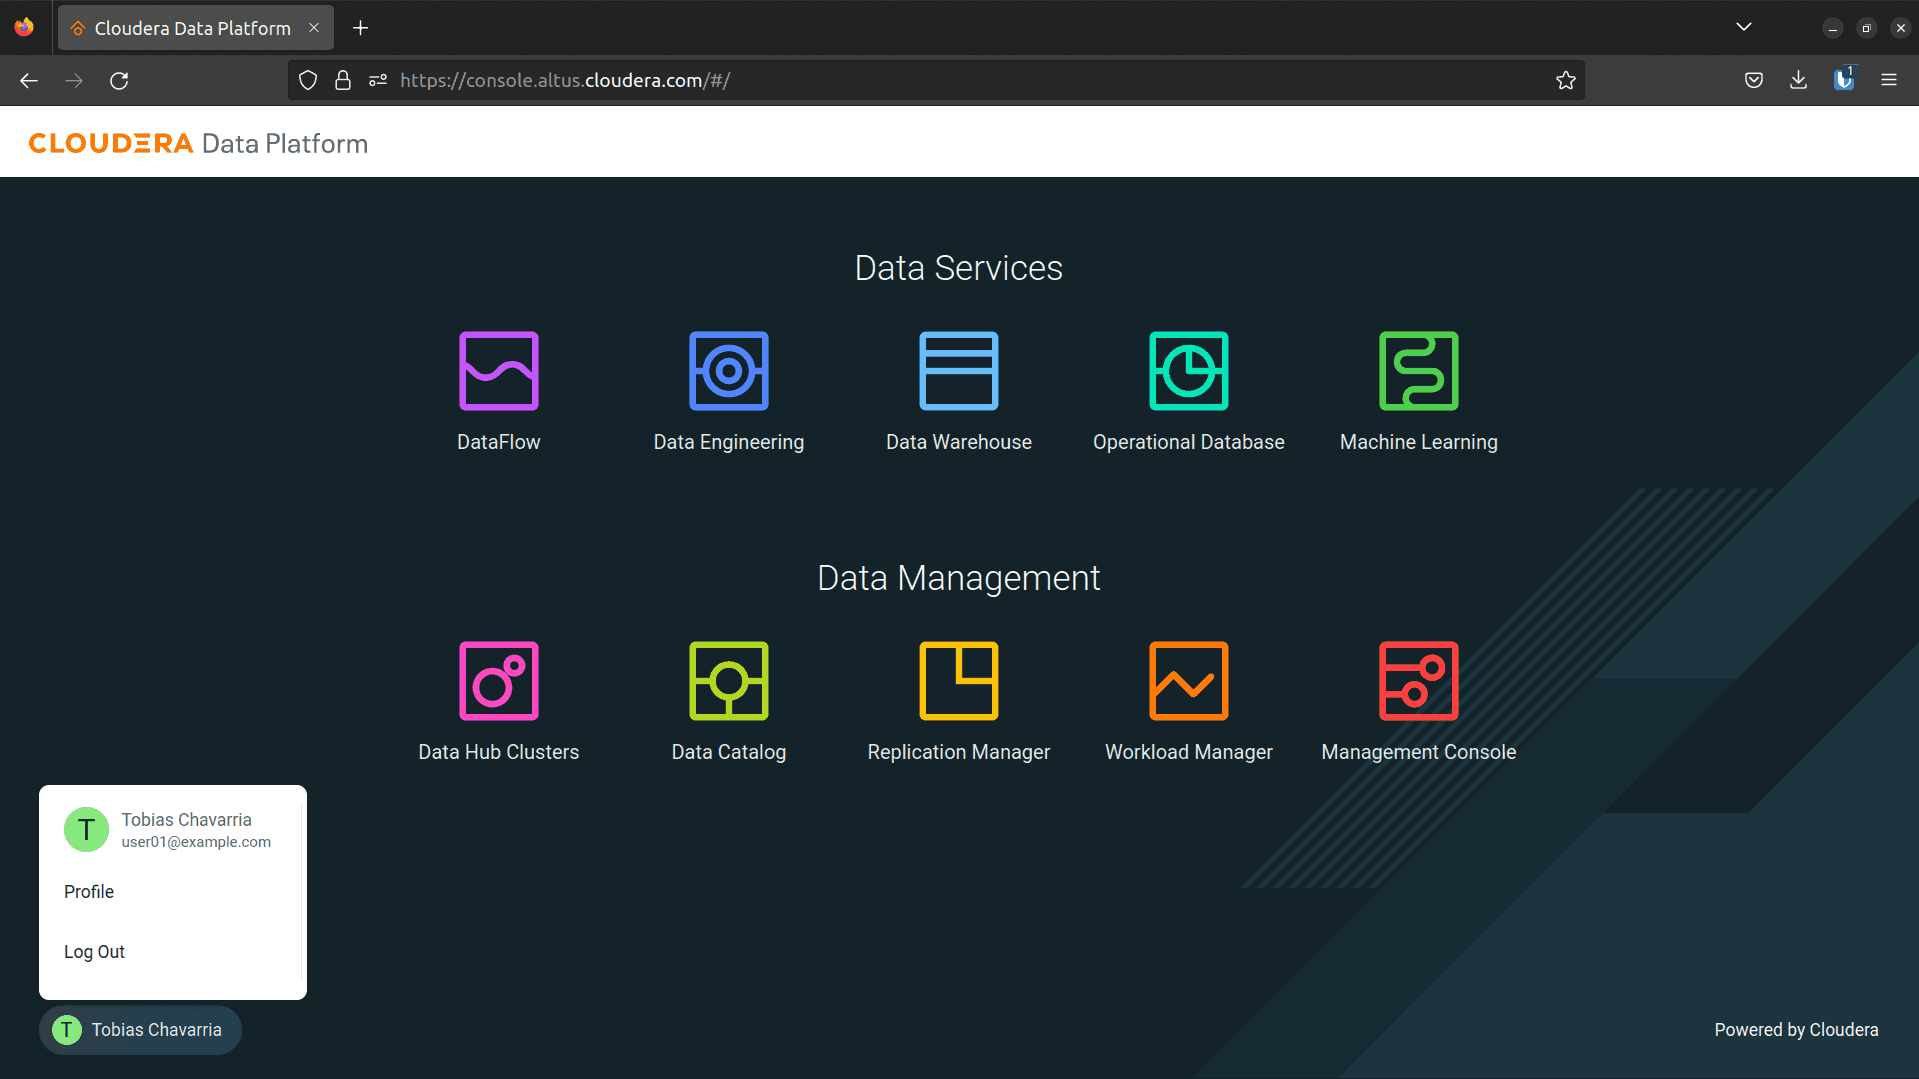
Check the person by login:


Configuration Utilizing the Terminal
This strategy is for customers extra aware of Keycloak or those that need an automatic course of.
As you’ll have already seen, configuring Keycloak utilizing the net interface might be tedious and a bit lengthy. Particularly the person creation process, for individuals who take care of huge teams and even only for testing functions, the net interface is just not one of the best thought.
The configuration through the terminal requires the next steps:
- Login and Test EC2 Necessities
- Create Credentials and Login to Realm Grasp
- Create the Realm and Obtain SAML Metadata
- Registering Keycloak in CDP
- Create CDP Shopper
- Create Customers
- Create Group and Add Customers
Login and Test EC2 Necessities
As we talked about earlier than, we’re assuming that Keycloak is working utilizing Docker Compose on an EC2 occasion.
Due to this fact, right here we’re going to hook up with this EC2 occasion and go contained in the Docker container to execute all of the instructions.
Native machine:
-
Set EC2 occasion required variables:
export PUBLIC_IPV4_DNS=<PUBLIC_IPV4_DNS> export AWS_SSH_KEY=<AWS_SSH_KEY> export EC2_USERNAME=ec2-user -
Connect with the EC2 occasion and examine that the information are there:
ssh -i "~/.ssh/${AWS_SSH_KEY}.pem" ${EC2_USERNAME}@${PUBLIC_IPV4_DNS}
The docker container working and you need to have the next structure:
./ubuntu
├── docker-compose.yml
└── kc_config
1 directories, 1 fileNow, we’re prepared to begin the configuration course of.
EC2 Occasion:
-
Go contained in the container:
docker exec -it keycloak bash -
Navigate to the exterior quantity listing:
Create Credentials and Login to Realm Grasp
This step creates a truststore credential required to log in to the Realm grasp through the terminal.
export PATH=$PATH:/decide/keycloak/bin
kcadm.sh config credentials --server http://localhost:8080/
--realm grasp
--user $KEYCLOAK_ADMIN
--password $KEYCLOAK_ADMIN_PASSWORDCreate the Realm and Obtain SAML Metadata
Now it’s time to register our Realm and get the SAML metadata required to register Keycloak as IdP in CDP.
export REALM="adaltas-cdp-lab"

export SAML_FILE=saml_provider.xml
kcadm.sh create realms
   --set realm=$REALM
   --set enabled=true
   --set sslRequired=none
curl
  -k http://localhost:8080/realms/adaltas-cdp-lab/protocol/saml/descriptor
  > $SAML_FILE
Since we want this file within the subsequent step, use the next command to repeat the SAML metadata into your native machine:
scp -i "~/.ssh/${AWS_SSH_KEY}.pem" ${EC2_USERNAME}@${PUBLIC_IPV4_DNS}:/dwelling/${EC2_USERNAME}/kc_config/saml_provider.xml ./Registering Keycloak in CDP
Use the Cloudera net interface to register Keycloak as IdP as described within the web interface approach.
Word: By the point the article was written this course of couldn’t be carried out through the CDP CLI as a result of the command cdp iam create-saml-provider was not working.
Create CDP Shopper
On this step, we’re going to create the CDP consumer on Keycloak utilizing the content material of cdp_client file and the
kcadm.sh create purchasers --target-realm $REALM -f - << EOF
{
   "clientId": "cdp-client",
   "surrogateAuthRequired": false,
   "enabled": true,
   "clientAuthenticatorType": "client-secret",
   "redirectUris": [
       "https://consoleauth.altus.cloudera.com/saml"
   ],
   "webOrigins": [
       "https://consoleauth.altus.cloudera.com"
   ],
   "notBefore": 0,
   "bearerOnly": false,
   "consentRequired": false,
   "standardFlowEnabled": true,
   "implicitFlowEnabled": false,
   "directAccessGrantsEnabled": false,
   "serviceAccountsEnabled": false,
   "publicClient": false,
   "frontchannelLogout": true,
   "protocol": "saml",
   "attributes": {
       "saml.assertion.signature": "true",
       "saml.drive.put up.binding": "true",
       "saml.multivalued.roles": "false",
       "saml.encrypt": "false",
       "saml_assertion_consumer_url_post": "https://consoleauth.altus.cloudera.com/saml?samlProviderId=${CDP_IdP_ID}",
       "saml.server.signature": "true",
       "saml_idp_initiated_sso_url_name": "cdp-sso",
       "saml.server.signature.keyinfo.ext": "false",
       "exclude.session.state.from.auth.response": "false",
       "saml.signature.algorithm": "RSA_SHA256",
       "saml_force_name_id_format": "false",
       "saml.consumer.signature": "true",
       "tls.consumer.certificates.sure.entry.tokens": "false",
       "saml.authnstatement": "true",
       "show.on.consent.display screen": "false",
       "saml_name_id_format": "username",
       "saml.onetimeuse.situation": "false",
       "saml_signature_canonicalization_method": "http://www.w3.org/2001/10/xml-exc-c14n#"
   },
   "authenticationFlowBindingOverrides": {},
   "fullScopeAllowed": true,
   "nodeReRegistrationTimeout": -1,
   "protocolMappers": [
       {
           "name": "my-email-id-mapper",
           "protocol": "saml",
           "protocolMapper": "saml-user-property-mapper",
           "consentRequired": false,
           "config": {
               "attribute.nameformat": "URI Reference",
               "user.attribute": "email",
               "friendly.name": "my-email-friendly-name",
               "attribute.name": "urn:oid:0.9.2342.19200300.100.1.3"
           }
       },
       {
           "name": "my-groups-mapper",
           "protocol": "saml",
           "protocolMapper": "saml-group-membership-mapper",
           "consentRequired": false,
           "config": {
               "single": "true",
               "attribute.nameformat": "URI Reference",
               "full.path": "false",
               "friendly.name": "my-groups-friendly-name",
               "attribute.name": "https://altus.cloudera.com/SAML/Attributes/groups"
           }
       },
       {
           "name": "my-firstname-mapper",
           "protocol": "saml",
           "protocolMapper": "saml-user-property-mapper",
           "consentRequired": false,
           "config": {
               "attribute.nameformat": "URI Reference",
               "user.attribute": "firstName",
               "friendly.name": "my-firstname-friendly-name",
               "attribute.name": "https://altus.cloudera.com/SAML/Attributes/firstName"
           }
       },
       {
           "name": "my-lastname-mapper",
           "protocol": "saml",
           "protocolMapper": "saml-user-property-mapper",
           "consentRequired": false,
           "config": {
               "attribute.nameformat": "URI Reference",
               "user.attribute": "lastName",
               "friendly.name": "my-lastname-friendly-name",
               "attribute.name": "https://altus.cloudera.com/SAML/Attributes/lastName"
           }
       }
   ],
   "defaultClientScopes": [
       "web-origins",
       "role_list",
       "profile",
       "roles",
       "email"
   ],
   "optionalClientScopes": [
       "address",
       "phone",
       "offline_access",
       "microprofile-jwt"
   ],
   "entry": {
       "view": true,
       "configure": true,
       "handle": true
   }
}
EOF
Create Customers
We create the customers by studying a csv file with the next format:
Title, LastName, username, e mailDue to this fact, inside your kc_config listing (EC2 or Docker Container) create a csv file with the knowledge of every person.
Word: Overview User and group limits and just remember to don’t exceed these limits.
Right here is an instance:
cat <<EOF > users_list.csv
Tobias, CHAVARRIA, user01, user01@instance.com
Albert, KONRAD, user02, user02@instance.com
Stephan, BAUM, user03, user03@instance.com
EOF
As soon as that is performed, we create the customers utilizing the next scripts:
export USERS_CSV_FILE=users_list.csv

export USERS_INITIAL_PASS="Pa55w0rd"
kc_create_user() {
  firstname=$1
  lastname=$2
  username=$3
  e mail=$4

  kcadm.sh create customers -r $REALM
   -s username=$username
   -s e mail=$e mail
   -s firstName=$firstname
   -s lastName=$lastname
   -s enabled=true

  kc_set_password $username $USERS_INITIAL_PASS
}
kc_set_password() {
  username="$1"
  initial_pass="$2"
  kcadm.sh set-password
    -r $REALM
    --username $username --new-password $initial_pass
}
import_users() {
  whereas learn -r line; do
   IFS=',' learn -ra arr <<< "$line"
   kc_create_user ${arr[0]} ${arr[1]} ${arr[2]} ${arr[3]}
  performed < "$USERS_CSV_FILE"
}
import_users $USERS_CSV_FILECreate Group and Add Customers
On this step, we’re going to create a gaggle and add ALL present customers on the given Realm into this group.
export GROUP_NAME="adaltas-students"

export USERS_ID_LIST=users_list
kcadm.sh create teams -r $REALM -s title=$GROUP_NAME
export GROUP_ID=$(kcadm.sh get teams -r $REALM | grep -o '"id" : "[^"]*' | grep -o '[^"]*$')
kcadm.sh get customers -r $REALM | grep -o '"id" : "[^"]*' | grep -o '[^"]*$' >> $USERS_ID_LIST
kc_add_group() {
  userid="$1"
  groupid="$2"

  kcadm.sh replace customers/$userid/teams/$groupid
    -r $REALM
    -s realm=$REALM
    -s userId=$userid
    -s groupId=$groupid
    -n
}


add_users_group() {
  n=1
  whereas learn -r userid; do

  learn -ra arr <<< "$userid"
  echo "Updating person: $userid"
  n=$((n+1))
  kc_add_group $userid $GROUP_ID
  performed < $USERS_ID_LIST
}
add_users_group $USERS_ID_LISTAs soon as the configuration is finished, customers can use the next login web page to entry the Cloudera console:
http://:8080/realms/ /protocol/saml/purchasers/cdp-sso
For added configuration or assessment, you can too entry the Keycloak net interface right here:
Subsequent Step: Configuring Permissions and Ranger insurance policies
By this level, Keycloak has been arrange because the id supplier for CDP, and now we have created our group of customers.
There may be nonetheless yet one more layer of configuration wanted within the person onboarding course of. Within the subsequent chapter, we’re going to present methods to configure the required permissions and insurance policies to permit customers to use our end-to-end structure.