MinIO is a well-liked object storage answer. Usually beneficial for its easy setup and ease of use, it isn’t solely an effective way to get began with object storage: it additionally gives glorious efficiency, being as appropriate for newcomers as it’s for manufacturing.
MinIO implements the object storage data architecture, which is scalable and easy in its implementation and makes use of. All object storage options are federated underneath the S3 interface open normal, and because of this, totally different S3-compliant object storage options work with varied S3-compatible functions.
Our presentation of object storage architecture states that object storage options aren’t restricted to the cloud: internet hosting them inside an area cluster is feasible. Internet hosting object storage regionally is an effective method to perceive the way it works each in its construction and utilization, both for growth and testing functions or whereas aiming to deploy it in manufacturing.
This text goals to cowl MinIO’s setup and utilization in an on-premise Kubernetes cluster. It’s a part of a sequence of three:
On this article sequence, the third article provides indications on tips on how to host object storage by way of Ceph with the Rook operator. MinIO is easy to put in and use. It gives object storage solely. As compared, Ceph is rather more modular. Along with object storage, it additionally gives file system and block storage.
What’s MinIO?
MinIO is an easy-to-deploy open-source object storage answer. It’s Kubernetes-native. It runs on a Kubernetes cluster of bare-metal {hardware} or digital machines.
Minio is usually deployed inside Kubernetes. Whereas it’s doable to put in it in your host machine, it isn’t frequent and we don’t cowl this deployment mode.
For early testing and growth functions, it’s doable to host a standalone MinIO Server in a single container which mounts directories as a substitute. This server is one single occasion of what the MinIO Kubernetes orchestrator deploys at cluster scale.
MinIO has two elements:
- MinIO Server, the central core of the thing storage and handler of the distributed information storage and associated providers;
- MinIO Consumer, a built-in S3 command-line software to entry and take a look at the storage, additionally suitable with different S3 storage.
Being Kubernetes-native means MinIO leverages Kubernetes Persistent Volumes and Persistent Volume Claims as a way to retailer information.
MinIO complies with the standard object storage structure, the place information is logically divided into buckets for information isolation. Minio is deployed in a Kubernetes cluster with the MinIO Operator. The MinIO Operator helps multi-tenancy. Tenants are a storage layer above buckets. Tenants are teams of customers with their very own units of buckets and their very own pods dealing with storage.
In the identical manner that AWS SDKs are supplied for a number of programming languages, MinIO presents its own set of SDKs. Utilizing the Minio SDK simplifies entry to the native MinIO object storage. It removes the configuration and dependencies complexity related to the utilization of the AWS SDKs.
Object storage with MinIO in a Kubernetes cluster
As acknowledged beforehand, MinIO might be deployed as a standalone container server for early testing. Extra superior MinIO setups embrace bare-metal installs utilizing the main repository’s resources, and a separate repository is devoted to the MinIO Kubernetes Operator for cluster deployment. The latter permits us to simply acquire a distributed MinIO occasion match for each growth and manufacturing eventualities, being fast to deploy and usually handy for this tutorial. The operator automates deployment within the cluster and handles complicated configurations for us by default, corresponding to certificates administration.
This tutorial requires:
- A Kubernetes cluster with a Container Network Interface (CNI) plugin put in (for instance, Calico);
- No less than 3 employee nodes with 3 GB of RAM;
- Obtainable unformatted disks in your employee nodes or unformatted partitions inside these disks. These should both be bodily units if on bare-metal, or digital disks if utilizing VMs.
This repository gives a template to simply acquire a cluster fulfilling this tutorial’s necessities.
Should you want to discover ways to add digital disks in a Vagrant cluster utilizing VirtualBox, check out this article.
Be aware: For a manufacturing cluster, separating employee nodes from object storage nodes is an effective follow, as computing operations and storage operations don’t have an effect on one another because of this. This is named asymmetrical storage.
Earlier than putting in
First, create the MinIO Tenant namespace. Tenants are MinIO object storage customers. Every namespace holds one MinIO tenant at most.
kubectl create namespace minio-tenant-1Then, set up Krew. Krew is a kubectl plugin installer, which permits us to put in crucial MinIO elements. It’s put in by operating the next instructions:
(
  set -x; cd "$(mktemp -d)" &&
  OS="$(uname | tr '[:upper:]' '[:lower:]')" &&
  ARCH="$(uname -m | sed -e 's/x86_64/amd64/' -e 's/(arm)(64)?.*/12/' -e 's/aarch64$/arm64/')" &&
  KREW="krew-${OS}_${ARCH}" &&
  curl -fsSLO "https://github.com/kubernetes-sigs/krew/releases/newest/obtain/${KREW}.tar.gz" &&
  tar zxvf "${KREW}.tar.gz" &&
  ./"${KREW}" set up krew
)

export PATH="${KREW_ROOT:-$HOME/.krew}/bin:$PATH"

kubectl krew replace
Making ready drives for MinIO with DirectPV
Earlier than initializing the MinIO Operator, one requirement for MinIO have to be stuffed. As beforehand famous, MinIO makes use of Kubernetes PVs, which have to be one way or the other supplied to ensure that MinIO to create its devoted object storage PVCs. The MinIO DirectPV driver automates this course of by discovering, formatting and mounting the cluster drives.
Set up the DirectPV plugin with Krew, after which set up the driving force itself:
kubectl krew set up directpv
kubectl directpv set up
On this tutorial, the drives are on the employee nodes. Nonetheless, in an actual manufacturing cluster utilizing object storage, it’s a good follow to separate your employee nodes out of your devoted storage nodes. That is achieved by making use of taints on these storage nodes. Then, it’s doable to specify taint tolerations as choices when putting in DirectPV.
After ready for DirectPV to initialize, test the detected disks. Among the many outcomes, the devoted storage disks in your nodes seems. Should you additionally want to see Unavailable disks, use the --all possibility:
kubectl directpv drives ls
The disks with no given filesystem, out there for object storage, are displayed on this checklist.
Now, choose the drives to be formatted and managed by DirectPV. Right here, use of the sd{a..f} operator selects all drives from sda to sdf for the nodes named demo-worker-0{1...3}, going from 1 by way of 3:
kubectl directpv drives format --drives /dev/sd{a...f} --nodes demo-worker-0{1...3}
kubectl directpv drives ls
The cluster drives are actually configured to be routinely used for PVs and PVCs with MinIO.
Putting in MinIO Operator
There are two methods to put in the MinIO Operator:
- By means of Krew utilizing the
minioplugin; - By means of Helm utilizing the MinIO Operator Helm Chart, permitting us to routinely configure the MinIO Operator and MinIO Tenant from
yamlvalues recordsdata.
Each are invaluable. Ultimate outcomes of every set up are similar.
Krew is already put in, we used it beforehand for DirectPV’s set up. It’s a handy method to find out how MinIO works. The method is decomposed into a number of instructions.
Helm additionally installs the MinIO Operator. Solely two instructions are essential to deploy the Minio Operetor and the preliminary Minio Tenant. Following the Helm philosophy, it gives declarative configuration and automation.
MinIO Operator with Krew
Proceed to put in the minio Krew plugin and initialize the MinIO Operator:
kubectl krew set up minio
kubectl minio init
Wait till the operator pods are operating, test with kubectl get pods -n minio-operator.
With the Operator operating, a Tenant should now be created. That is both performed by way of the MinIO console as proven right here, or through the command-line. The MinIO console is accessed by quickly forwarding ports from the host machine to the console pod. Open a separate terminal window related to the grasp node and run the next command, which doesn’t return:
kubectl minio proxy -n minio-operator
Open your net browser. The tackle used to hook up with the console adjustments if:
- there isn’t any Ingress controller in your cluster, use your cluster control-plane IP as a substitute of
localhost, for instance:http://192.168.56.10:9090for the cluster supplied in stipulations; - an Ingress controller exists in your cluster, the place utilizing this proxy will not be doable with out additional setup. A greater method to deal with Ingresses with MinIO is by alternatively installing the MinIO Operator with the Helm Chart and enabling Ingress within the values recordsdata.
As soon as accessing the operator console, use the supplied JWT token to authenticate.
If confronted with a clean web page after the JWT token immediate, the browser can not belief the Certificates Authority. Altering net browsers helps clear up the problem. For additional assist, observe instructions here.
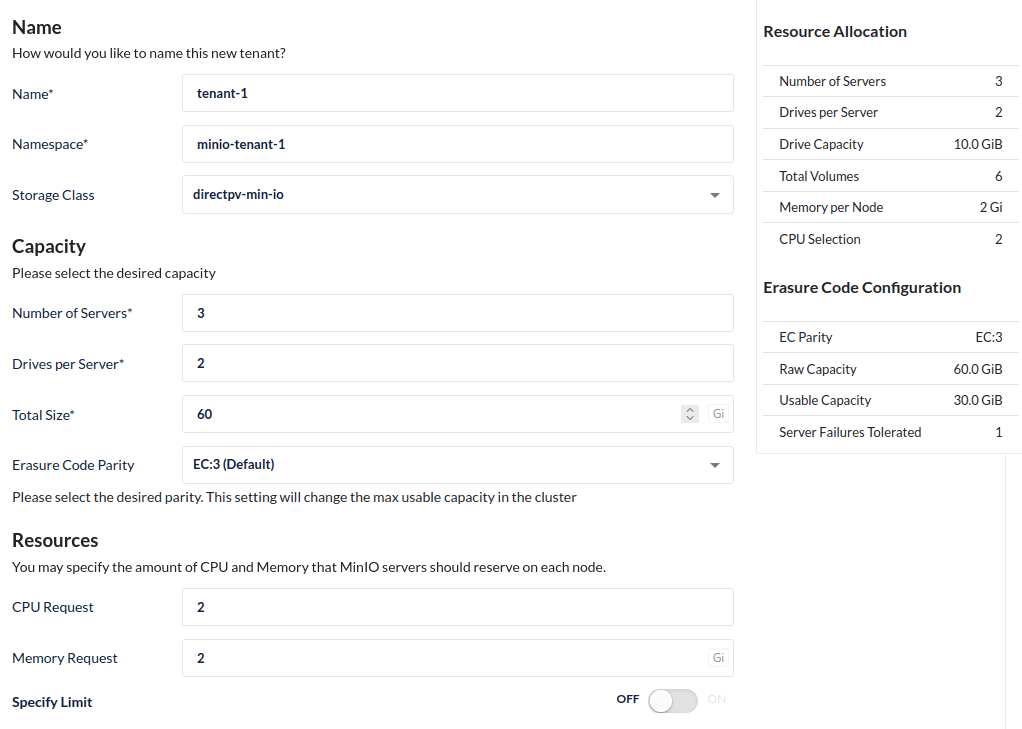
After authenticating, click on the Create Tenant button on the highest proper. A setup web page opens.
The fields are documented on the MinIO tenant setup. For this S3 object storage take a look at, fill the fields as follows, with the Complete Dimension area set to a price inside the complete capability of your formatted node disks:
- Identify: tenant-1;
- Namespace: minio-tenant-1;
- Storage Class: directpv-min-io;
- Variety of Servers: 3;
- Drives per Server: 2;
- Complete Dimension: 60 Gi.
It’s also useful to disable TLS within the Safety tab throughout this tutorial: this permits us to attach utilizing the MinIO Consumer afterward with out certificates.
Upon creation, you might be supplied with S3 credentials. Be aware them down or save them in your laptop in a short lived file for later use throughout testing.
MinIO then makes an attempt to deploy the tenant pods. Checking their standing is both performed within the Pods tab of the operator console, or with kubectl get pods -n minio-tenant-1. The console shows a inexperienced dot subsequent to the tenant standing when object storage is prepared.
If these pods fail to create, the operator console gives handy investigation instruments. The
Occasionstab signifies all occasions within the tenant namespace. Within thePodstab, clicking one pod grants entry to the podLogstab.
MinIO Operator with the Helm chart
This half covers steps for an alternate, extra superior set up. Skip to testing the object storage instance if this different set up will not be crucial in your case.
Krew follows a step-by-step method to put in MinIO and create a tenant. Declarative configuration and automation comes as the following step as a substitute of manually accessing the operator console. That is the place the MinIO Operator Helm Chart and the MinIO Tenant Helm Chart shine.
Helm manages the deployment of Kubernetes functions and their configuration. These deployments, known as Charts, are sometimes given YAML configuration recordsdata. Utilizing these manifests for the configuration permits for extra versatile, declarative setups.
To get began with this set up, first set up Helm:
curl -fsSL -o get_helm.sh https://uncooked.githubusercontent.com/helm/helm/essential/scripts/get-helm-3
sudo chmod 0700 get_helm.sh
./get_helm.sh
Then, obtain the operator values file and, optionally, the tenant values file.
curl -fsSL -o operator-values.yaml https://uncooked.githubusercontent.com/minio/operator/grasp/helm/operator/values.yaml
curl -fsSL -o tenant-values.yaml https://uncooked.githubusercontent.com/minio/operator/grasp/helm/tenant/values.yaml
On this case, the MinIO operator and tenant are configured of their respective values recordsdata. Beginning with the supplied default values recordsdata is beneficial. Change values within the manifests as indicated within the above checklist with an editor, for instance nano operator-values.yaml and nano tenant-values.yaml.
A very powerful fields for the MinIO configuration lie within the tenant values:
tenant.swimming pools.serverspermits us to manage the variety of pods internet hosting MinIO servers cases. As this tutorial assumes 3 nodes, the suitable worth is3;tenant.swimming pools.volumesPerServermust match the quantity of drives per node. The ultimate quantity of object storage volumes is the volumes per server instances the quantity of servers. Be aware that extra, separate volumes seem when logging or metrics options are enabled;tenant.swimming pools.storageClassNamemust be set todirectpv-min-ioto let MinIO use DirectPV’s volumes;- Setting
tenant.certificates.requestAutoCerttofalsedisables TLS for MinIO for this tutorial, permitting the MinIO Consumer to attach with out certificates to object storage.
The 2 following fields are non-compulsory:
tenant.swimming pools.tolerationspermits MinIO to bypass taints when utilizing devoted storage nodes;tenant.ingress.api.enabledandtenant.ingress.console.enabledeach should be set totrueif you’re utilizing an Ingress controller inside the cluster. Set theingressClassNamerelying on the Ingress controller sort, and fill thehostfields utilizing domains likeminio.mydomain.comandminio-console.mydomain.comrespectively.
The operator values are extra simple: solely the Ingress area and toleration fields, when required, should be set.
Be aware, putting in the tenant by way of Helm will not be obligatory. It can be created manually by way of the operator net console as lined within the Krew set up half. Nonetheless, the Helm set up bundles every thing collectively, together with Ingress creation related to all MinIO providers.
As soon as the specified configuration is ready within the values recordsdata, set up the operator and the tenant charts:
helm repo add minio https://operator.min.io/
helm improve --install --namespace minio-operator --create-namespace minio-operator minio/operator --values operator-values.yaml
helm improve --install --namespace minio-tenant-1 --create-namespace minio-tenant-1 minio/tenant --values tenant-values.yaml
Short-term entry to the MinIO operator console from the host machine is finished by way of the next command, from one other terminal:
kubectl port-forward --address 0.0.0.0 -n minio-operator service/console 9090:9090Navigate to the management aircraft tackle on port 9090 on an online browser to entry the console. On the supplied demo cluster, the proper tackle is http://192.168.56.10:9090. The JWT to authenticate is obtained with the next command:
kubectl -n minio-operator get secret console-sa-secret -o jsonpath="{.information.token}" | base64 --decodeTesting the thing storage
With the tenant operating in a wholesome state (indicated by a inexperienced dot within the operator console), it’s doable to straight take a look at our S3 object storage occasion from the operator console. From the checklist of tenants, click on on the tenant and click on on the Console button on the highest proper, redirecting you to the Tenant administration console.
This tenant being empty at first, begin by making a bucket, e.g my-bucket. Add an instance file utilizing the Add button on the highest proper. As soon as uploaded, the file seems as follows:

Clicking on the file permits you to obtain it again, making certain that object storage internet hosting was profitable!
Entry to this bucket is granted freely from the operator console, however is in any other case granted by way of the S3 credentials generated when creating the tenant.
Utilizing the MinIO Consumer to entry object storage
The MinIO Server offering object storage is now established, and accessing it with out going by way of the MinIO console on the internet is finished both programmatically with SDKs such because the MinIO JavaScript SDK on npm, or by way of S3 CLI shoppers such because the MinIO Consumer, mc.
Approved actions for object storage customers are outlined as insurance policies, as MinIO makes use of Policy-Based Access Control (PBAC). These insurance policies vary from readonly to consoleAdmin, and are set both from the MinIO console or utilizing the MinIO Consumer’s mc admin coverage command.
Set up mc:
wget https://dl.min.io/consumer/mc/launch/linux-amd64/mc
chmod +x mc
Then:
- Fetch the S3 entry key and secret key They’re required as a way to hook up with any S3 storage. Within the Krew set up, these had been beforehand saved. In any other case, creating new credentials is defined beneath;
- An S3 endpoint is required. Setups with Ingresses and load-balancers show this endpoint within the
Abstracttab of the tenant. In any other case, the endpoint must be port-forwarded to be accessed on the VM utilizingmc. Since port-forwarding doesn’t return, run this command in one other terminal window within the grasp node:
kubectl port-forward -n minio-tenant-1 service/minio 8080:80The ensuing endpoint is http://127.0.0.1:8080.
Should you want to use totally different credentials, or if the tenant creation didn’t generate them, it’s doable to create new S3 entry and secret keys from the tenant console. To take action:
- Go to the tenant within the operator console, entry the tenant’s console utilizing the highest proper
Consolebutton, broaden theIdtab and navigate toCustomers; - Click on on
Create Personand supply each title and password which capabilities as an entry/secret key pair; - Allow the
readwritecoverage for this person.
The next command units the S3 configuration as an alias in mc:
./mc alias set my-minio-server MINIO-ENDPOINT> ACCESS-KEY> SECRET-KEY>mc gives totally different instructions to carry out frequent file actions corresponding to ls, cp, mv, and in addition has particular options corresponding to creating buckets or operating SQL queries towards objects. To get a full checklist of these instructions, run ./mc -h.
Placing a file in MinIO or any S3 object storage is finished by way of the cp command present in most S3 shoppers. Let’s create a take a look at bucket, put an instance textual content file in S3 storage and retrieve it as a easy method to illustrate its utilization:
echo Hi there, S3 Storage > /tmp/test-file.txt
./mc mb my-minio-server/test-bucket
./mc cp /tmp/test-file.txt my-minio-server/test-bucket
./mc cp my-minio-server/test-bucket/test-file.txt /tmp/test-file-from-s3.txt
cat /tmp/test-file-from-s3.txt
The
mc cpcommand helps globs.
Be aware that test-file.txt now exists within the object storage and is accessible from the MinIO console, within the new bucket.
Devoted nodes for storage
Within the setup supplied right here, employee nodes additionally deal with storage units, however it’s doable to make use of Kubernetes Taints and tolerations to make use of devoted storage nodes. Taints stop common jobs from operating on these low-spec nodes, and MinIO is given tolerations to make use of the nodes for information storage.
If this setup is desired, making use of these tolerations is required for DirectPV set up:
kubectl directpv set up --node-selector 'storage-node=true' --tolerations 'storage-node=true:NoSchedule'Tolerations additionally should be given when making a MinIO tenant, underneath the Pod Placement tab if utilizing the Operator console or as tolerations within the operator manifest if utilizing the Helm charts.
Why MinIO over Ceph?
Ceph is one other storage answer, offering object storage as certainly one of its three storage modes together with file programs and block storage. We cowl its elements and set up steps within the following article within the sequence. Listed below are key indications evaluating each:
Professionals:
Cons:
- Documentation-wise, MinIO’s will not be as clear as Ceph’s or Rook’s, with lacking particulars and doable confusion;
- The MinIO operator console will not be excellent and suffers from some bugs.
Conclusion
Object storage is a match information structure for Massive Knowledge eventualities, and deploying an area object storage answer permits us to know the way it works and tips on how to leverage it in functions processing this information.
MinIO presents the advantages of being deployed rapidly and configured with relative ease for a primary setup whereas nonetheless permitting for superior configuration for manufacturing eventualities or integration with different providers. As an S3-compliant object storage answer, it’s suitable with any S3 consumer.
Whereas we lined the utilization of the MinIO Consumer mc to entry object storage, utilization of different S3 CLI shoppers doesn’t differ enormously. As to be used in packages, AWS SDKs or MinIO SDKs require minimal configuration to work along with your on-prem object storage.
Extra complicated configuration steps for object storage with MinIO embrace information replication throughout buckets. Steps on tips on how to obtain it are given within the official documentation.