Home windows Azure, recently renamed Microsoft Azure in 2014, is a public cloud computing platform supplied by Microsoft to construct, handle, and deploy providers and functions via a world community of knowledge facilities. Azure offers a spread of cloud providers, similar to analytics, compute, networking, storage, and extra. Azure is a public cloud supplier with options together with Software program as a Service (SaaS), Infrastructure as a Service (IaaS), and Platform as a Service (PaaS). Azure is a versatile, quick, reasonably priced, and dependable cloud computing platform. The capabilities and pricing of this platform make it top-of-the-line public cloud choices in at present’s market.
Customers can open a port or create an endpoint to a digital machine (VM) in Microsoft Azure by making a community filter on a VM community interface or a subnet. Customers can place these filters, which management each outbound and inbound visitors, on a community safety group hooked up to the useful resource that receives the visitors.
This tutorial demonstrates the steps to create a community filter that makes use of the usual TCP port 80. We assume that the person has already began the suitable providers and opened any working system firewall guidelines on the digital machine (VM). After the person has created a digital machine that’s configured to serve internet requests on the usual TCP port 80, they’ll carry out the next:
- Create a community safety group.
- Create an inbound safety rule permitting visitors and assign the settings values:
- Vacation spot port ranges: 80
- Supply port ranges: * (permits any supply port)
- Precedence worth: Enter a worth lower than 65,500 and better in precedence than the default catch-all deny inbound rule.
- Affiliate the community safety group with the subnet or VM community interface.
Utilizing the Azure Portal
To be able to open a port to a digital machine (VM) with the Azure portal, observe the under steps:
Step 1: Check in to Azure Portal
First, check in to the Azure portal utilizing the under URL:
Step 2: Create a Community Safety Group
- Search and choose the useful resource group for the digital machine (VM), select Add, then seek for and choose the Community safety group choice.
- Then, click on the Create button.
- After that, the Create community safety group window opens, as proven under.
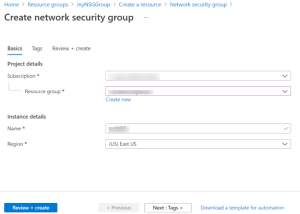
- Enter a reputation for the person’s community safety group and choose or create a useful resource group, then select a location.
- Lastly, choose the Evaluation + create button to create the community safety group.
Step 3: Create an Inbound Safety Rule
- Choose the newly created community safety group.
- Then, select the Inbound safety guidelines choice from the left menu and click on the Add button.
- Customers can restrict the Supply, and Supply port ranges as wanted or select the default (Any) setting.
- Customers may also restrict the Vacation spot particulars as required or go away the default (Any) settings.
- After that, choose a regular Service from the drop-down menu, similar to HTTP. Customers may also select Customized settings in the event that they need to present a selected port to make use of.
- (Elective) Then, change the Identify or Precedence. The precedence will have an effect on the order during which the principles get utilized: the decrease the numerical worth, the sooner the rule is utilized.
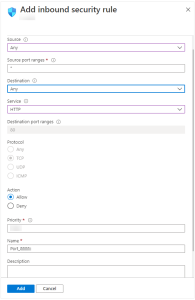
- Lastly, click on the Add button to create the rule.
Step 4: Affiliate the Community Safety Group with a Subnet
The ultimate step is associating the person’s community safety group with a selected community interface or a subnet. For this tutorial, we’ll affiliate the community safety group with a subnet. For that, observe the under steps:
- First, choose the Subnets choice from the left menu, after which choose the Affiliate choice.
- Choose the person’s digital community, and select the suitable subnet from the drop-down.
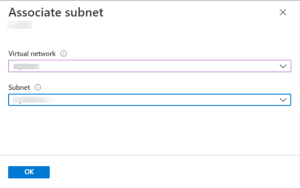
- Lastly, click on the OK button.
Utilizing the PowerShell
To be able to create a Community Safety Group and ACL guidelines, customers want the newest model of Azure PowerShell put in. Observe the under steps to open ports and endpoints to a VM utilizing PowerShell.
First, log in to the Azure account by executing the next command:
Join-AzAccount
Within the following examples, change the parameter names with the person’s personal values. Instance parameter names embrace the Useful resource Group, Community Safety Group, and Digital Community particulars.
Then, create a rule with New-AzNetworkSecurityRuleConfig. On this tutorial, we’ll create a rule named myNetworkSecurityGroupRule to permit TCP visitors on port 80, as proven under:
$httprule = New-AzNetworkSecurityRuleConfig `

    -Identify "myNetworkSecurityGroupRule" `

    -Description "Enable HTTP" `

    -Entry "Enable" `

    -Protocol "Tcp" `

    -Path "Inbound" `

    -Precedence "100" `

    -SourceAddressPrefix "Web" `

    -SourcePortRange * `

    -DestinationAddressPrefix * `

    -DestinationPortRange 80
Subsequent, create the Community Safety group with New-AzNetworkSecurityGroup and assign the HTTP rule that the person simply created as follows. The next will create a Community Safety Group named myNetworkSecurityGroup:
$nsg = New-AzNetworkSecurityGroup `

    -ResourceGroupName "myResourceGroup" `

    -Location "EastUS" `

    -Identify "myNetworkSecurityGroup" `

    -SecurityRules $httprule
Now, assign the created Community Safety Group to a subnet. The next instance will assign an current digital community named myVnet to the variable $vnet with Get-AzVirtualNetwork, as proven under:
$vnet = Get-AzVirtualNetwork `

    -ResourceGroupName "myResourceGroup" `

    -Identify "myVnet"
After that, affiliate the created Community Safety Group with the subnet with Set-AzVirtualNetworkSubnetConfig. The next instance will affiliate the subnet named mySubnet with the Community Safety Group, as proven under:
$subnetPrefix = $vnet.Subnets|?{$_.Identify -eq 'mySubnet'}

 Set-AzVirtualNetworkSubnetConfig `

    -VirtualNetwork $vnet `

    -Identify "mySubnet" `

    -AddressPrefix $subnetPrefix.AddressPrefix `

    -NetworkSecurityGroup $nsg
Lastly, replace the digital community with Set-AzVirtualNetwork. To ensure that the modifications to take impact, execute the next command:
Set-AzVirtualNetwork -VirtualNetwork $vnet
Conclusion
This tutorial presents the steps to open ports to a digital machine (VM) with the Azure portal and PowerShell. Hope this tutorial was useful, and do attain out to us you probably have any queries or options.